Features
|
|
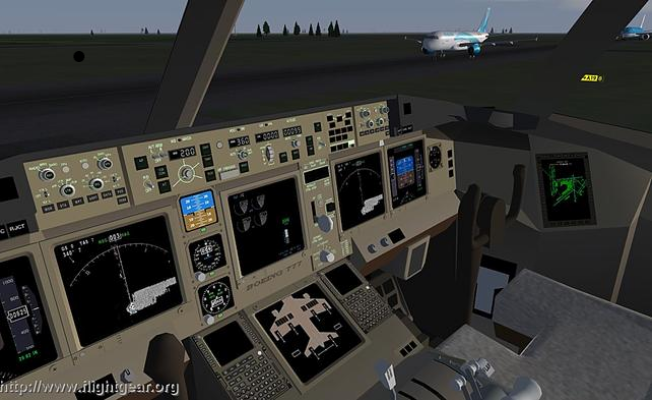
In the cockpit of a Boeing 787
|
There are many features, Add-ons etc. available to enrich the
usefulness
and fun of the FlightGear Simulator. In this book we only list those
which are available under the OS (Open Source)
Licenses, like FlightGear. This also means that they are charge-free,
but also that they can be changed any time. It is up to you to decide
if you always want to download the newest versions or rather wait till
that new one has stabilized - and also to
make sure that they do fit to your FlightGear version. In the following
we
will list the ones most used. Those we also tested under
FlightGear-version 2.4. You should always check the latest status in
the FlightGear Wikis:
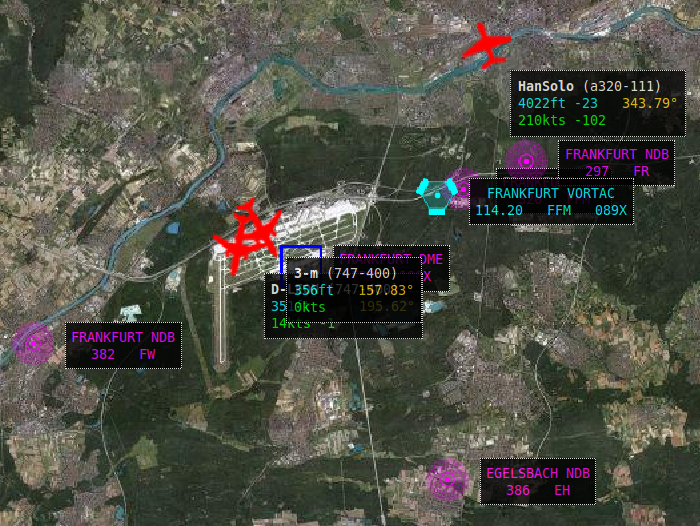
Multiplayer
This
is the basic interface from FlightGear to enable contact between
different pilots and or features. It connects you to the
FlightGear-Server-Network, which samples all flight-data from all
participants and distributes those. Thus you can e.g.:
- See
who is flying in your area: When flying you can always select
"menu-bar → Multiplayer → Pilotlist"
(in older versions that is
"Network → Pilotlist"). This will open a list showing all
pilots in the area of 100 nm around you, including date like:
Altitude, distance from you,
their aircraft-model, heading from you to that aircraft, etc. It will
not list yourself, because you serve as reference to that date - i.e.
you are the center of it all!
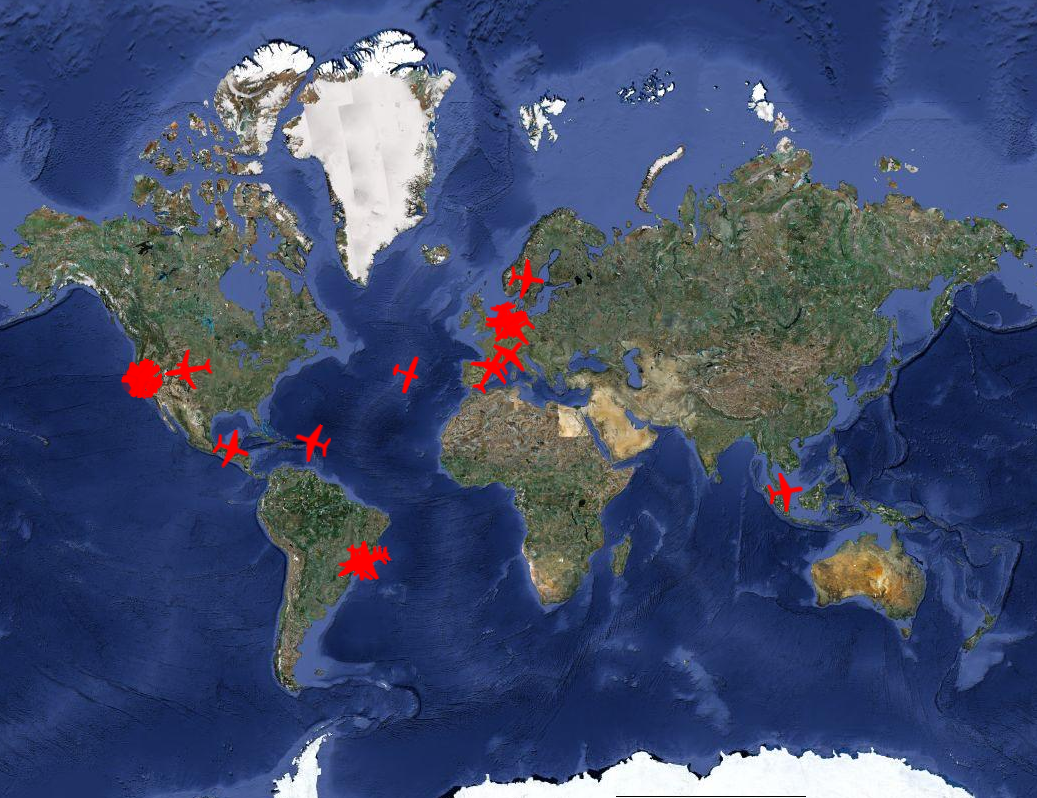
- See
who is flying anywhere around the world. The picture on the
left shows you an example of how you can visualize those date with the
feature MPmap. With MPmap you can
display also your own position,
and also all airports, Navigational aids, street-maps etc.
- Communicate
with others: Again over the "menu-bar → Multiplayer → Chat" (in older versions "menu-bar → Network →
Chat Dialog") you can exchange messages with any
other co-pilot within your distance of 100 nm. If you use the
additional feature FGCOM then you can even talk to them.
You can use
these functions only when you are connected to the Internet - only then
the menu-bar-item "Multiplayer" (or in older versions:
"Network") is activated.
|
You need the following options in your Startup-File
to activate this basically installed feature:
--callsign=<anything>
--multiplay=out,10,<server>,<portnumber>
--multiplay=in,10,<client>,<portnumber>
--enable-ai-models
(of course you can set those options also by using the FGrun-feature -
see "Starting with FGrun").
The above options are used for:
--callsign= The name under which
you want to be known in Multiplayer
You cannot reserve a unique name for
yourself - but you can change it any time. But that means you could
also grab the name from somebody who is not logged into Multiplayer at
that moment - and reverse. So you (and all your friends) should check
if a wanted "name" is already used, prior to using it: To do so
open
http://fgfs.i-net.hu/modules/fgtracker/
and type into the field "Enter your Callsign" the one you would like to
use - and then wait for the response (it may take a while!). If that
code is in use already you will get a list of what somebody did already
- so please do not use that code!!
Please make sure you get an unique code for yourself, so
that your friends can identify you within the Multiplayer
environment - and that your "exploits" are registered and you can
list them as shown above.
--multiplay=out,10,MPserver08.flightgear.org,5000
This option connects you with the
central server via your Port 5000. The Port must be 5000 - the server
you can chose from many, see
http://mpmap01.flightgear.org/mpstatus/
. Chose a serve close to you in order to reduce responsetimes
(although nowadays that is not that critical any more! You can always
try to use any other, if the one you just used is out of service - or
does not respond.
--multiplay=in,10,My-PC,5000
or e.g.:
--multiplay=in,10,192.168.178.30,5000
This option is for the way back from
the central server to you. In the center is your PC-IP (e.g.
192.168.178.30) - in direct connections you may replace this with just
"localhost" or the PC-Name. If you need the IP-Nr open a Command-Window
and enter the following command:
|
for Windows: ipconfig
|
for linux: ifconfig
|
C:\Dokumente und Einstellungen\DeinPC-Name>ipconfig
Ethernetadapter
LAN-Verbindung:
...
IP-Adresse. .
. . . . . . . . . . : 192.168.178.11
Subnetzmaske.
. . . . . . . . . . : 255.255.255.0
Standardgateway
. . . . . . . . . : 192.168.178.1
...etc.
|
YourName@YourPC-Name:~$ ifconfig
eth0
Link encap:Ethernet HWaddr 00:24:8c:62:6d:0e
...
inet addr:192.168.178.11
Bcast:192.168.178.255
Mask:255.255.255.0
...etc.
|
See the red value behind "IP-Adresse“
or "inet addr:“: That is the IP-Nr of your PC!
--enable-ai-models
in addition to the "Multiplay-Options"
you have to "enable the artificial intelligence models" in order to see
the models of the other Multiplayers.
Also see: http://wiki.flightgear.org/index.php/Multiplayer
FGCOM
"FlightGear
Communication" is an Add-On program, that enables "Radio-Communication"
between Multiplayers. Without it you only can type messages between
Multiplayers - which proves to be very time-consuming. Also it usually
is very difficult to fly any procedure (using two hands!) and type
sentences on the keyboard! With FGCOM you can just talk like on a
telephone.
To install the free FGCOM see: http://wiki.flightgear.org/index.php/FGCOM
After you have installed FGCOM you need to enable the interface between
those two programs to control the settings of the Radio-frequencies and
open/close the microphone (PTT = Push To Talk). Add the option:
--generic=socket,out,10,localhost,16661,udp,fgcom
- Just use the values as shown.
- Only if you have a LAN-installation with multiple PC's you may
have to replace the common "localhost" with the unique IP-Address of
your PC.
- You can replace the standard Port "16661" with another Port, if
e.g. you are using multiple instances of the FGCOM-program (e.g. 5504
and similar)
- You then start FGCOM with the command
- "fgcom Sfgcom.flightgear.org.uk aEDDF f127.32 i0.0 o1.0
p16661"
- make
sure you are using here the same Port (e.g. 16661) as in the above
described FlightGear-Option!
- And ask your Network-Administrator to open the Firewall for that Port! (We strongly
suggest to use Firewalls for your private security!)
See further informations in:
http://wiki.flightgear.org/index.php/Fgcom
http://code.google.com/p/fgcomgui/
Atlas
The
Feature "ATLAS" displays a chart showing the the FlightGear-data of
that region you are in. Included is your position and movement,
all the Navigational Points , etc. Atlas only needs a interface to your
local FlightGear-Installation - thus you can use it like a navigation
system without having a constant connection with the Internet! But then you
will not see the Multiplayers in your area!
Install Atlas according to
After you have installed ATLAS enable it with the FlightGear
start-option:
--atlas=socket,out,1,localhost,5505,udp
This is by the way the same connection, that you also need for TerraSync.
If you want to use ATLAS and FlightGear on different PC's, then replace
the common "loacalhost" with the unique "IP-Adress" of your ATLAS-PC.
(If you need to find out the IP of your pc see MP!)
For further informations see: http://wiki.flightgear.org/index.php/Atlas
MPmap
MPmap is, contrary to the ATLAS, a pure Internet-Browser-Application -
that means you need an uninterrupted Internet-connection.
The MPmap shows a map similar to the Google-Earth, but including the
FlightGear Multiplayer data. You can display all the active
Multiplayers worldwide and all the navigational informations available
in FlightGear. Like in Google-Earth you can switch between a view
"Map", "Hybrid", and "Satellite".
You do not need any unique installation for it, except an
Internet-Browser of your choice. That means you can view the present
status from any PC connected to the INTERNET, without having FlightGear installed! Just enter the MPmap-address into your
browser: http://mpmap01.flightgear.org/
Instead of the "mpmap01" server you may use another one, see the list
under http://mpmap01.flightgear.org/mpstatus/
.
For further informations see: http://wiki.flightgear.org/index.php/MPmap
MAP
Map is another navigational chart,
specialized for Radio-Navigation. Since FlightGear version 2.4. it is
an
integrated part of FlightGear.
See its description under "Map" in the
part "RNAV".
Aircraft-Carrier
Over the years, FlightGear has been equipped with a vast amount of aircraft carriers
that allow pilots to simulate the entire range of carrier operations,
from catapult takeoffs, to "controlled crashes", including
aircraft-lifts, TACAN (Tactical
Air Navigation) and FLOLS (Fresnel
Lens Optical Landing System). The Carrier itself is controlled by
one "Multiplayer.
See the following list of available carries:
Carrier
|
Scenario
|
TACAN
|
Standard-Location +
avail. Parking Positions
|
Nimitz
|
nimitz_demo
|
029Y
|
West of San Francisco, USA,
in the Pacific
parkpos: cat-1..4, park-1, wires
|
Eisenhower
|
eisenhauer_demo
|
030Y
|
???
parkpos: cat-1..4, park-1
|
Clemenceau
|
clemenceau_demo
|
026Y
|
south of Marseille,
France, in the Mediterranean Sea
parkpos: cat-1..2, park-1..3, wires
|
Foch
|
Foch_demo
|
026X
|
???
parkpos: cat-1..2, park-1..2, wires
|
Akagi
|
akagi
|
N/A
|
NA
|
The listed "home-location" may be changed for any event.
For further informations see: http://wiki.flightgear.org/index.php/Carrier
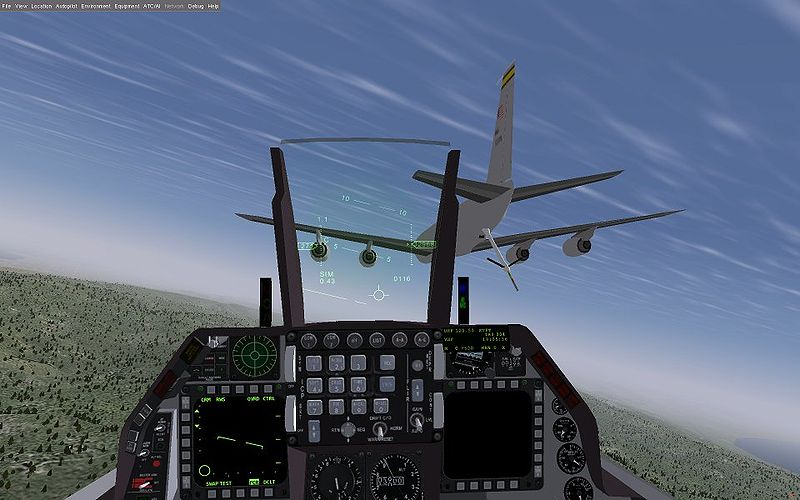
Air-To-Air Refueling, AAR
|
|
Aerial refueling, also
called air refueling, in-flight refueling (IFR),
air-to-air refueling (AAR) or tanking, is
the process of transferring fuel from one aircraft
(the tanker) to another (the receiver) during flight.
Right now there are 2 Tankers and 9 airplanes especially designed for
these functions. But those numbers are constantly increasing. So if you
would like to use any other aircraft for this, check in its "menu-bar -->
AI": If there are entries related to tankers, then you can use this
plane.
For further Informations and/or "HowTo" see:
http://wiki.flightgear.org/index.php/Howto:_Aerial_refueling.
|
TTS
= Text To Speech (Festival)
FlightGear supports TTS-systems for ATC and tutorial messages,
that are displayed on the Screen. When TTS is activated those messages
will be converted and "spoken" via the loudspeakers.
One Warning:
When you are using FGCOM you might consider to disable the TTS-System,
because otherwise you might not understand any message spoken at the
same time - 1 from the FGCOM and 1 from the TTS. And neither a "human
ATC", nor your "fellow Multiplayers" will like it, when you do not
respond to FGCOM questions/informations/advises! To the contrary a
written MPchat message over a spoken FGCOM message can always be read
(and redisplayed) undisturbed from FGCOM!
For furtherer Informations and/or "HowTo" see:
http://wiki.flightgear.org/index.php/De/TTS_%3D_Text_to_Speech
(Sorry: an English translation is not yet available)
Multiple
Displays
FlightGear supports multiple displays. Using some straightforward
XML, you can configure multiple "slave cameras" that are offset from
the main view, so you can use multiple monitors to display a single
view of the simulator. For example, you can have one display showing
the view straight ahead, while two additional displays show the views to
either side.
Information on configuring multiple displays can be found in the
README.multiscreen file in your $FG_ROOT/Docs
directory
and/or in http://wiki.flightgear.org/index.php/Howto:_Configure_camera_view_windows
Multiple Computer
FlightGear allows you to connect multiple instances of the program
using the very flexible I/O subsystem, and display completely different
views and controls on different computers. This can be used in
combination with the Multiple Display support to create a more
sophisticated environment with separate cockpit panel displays and even
a separate control station allowing an instructor to fail instruments,
change the weather etc.
An example of this is the 747 cockpit project: http://www.flightgear.org/Projects/747-JW/
See how to do it on: http://wiki.flightgear.org/index.php/Howto:_Multi-computing_FlightGear
Recording and Playback
As well as the Instant Replay feature within the simulator, you
can record your flight for later analysis or replay using the I/O
system. Technical details of how to record specific FDM information can
be found in the $FG_ROOT/protocol/README.protocol
file.
To record a flight, use the following command line options:
--generic=file,out,20,flight.out,playback
This will record the FDM state at 20Hz (20 times per second), using the
playback protocol and write it to a file flight.out.
To play it back later, use the following command line options:
--generic=file,in,20,flight.out,playback
--fdm=external
The playback.xml protocol file does not include information such as
plane type, time of day, so you should use the same set of command line
options as you did when recording.
Additional Education
In addition to this Manual there are many other possibilities to
support Pilot-Education:
"Dual Control"
There are more and more models with "Dual Control", i.e, they are
especially equipped for 2 Pilots flying the same model. Those you can
use to have a personal Flight-Instructor sitting besides you (even if you are in Germany and the
instructor in the USA).
See a current list of the available "Dual Controll Models" and the
usage of those under: http://wiki.flightgear.org/index.php/Dual_control
There also is a unique "Tutor-System" simulating an instructor who
explains, watches and grades exercises you do yourself. Those
exercises are available in different aircraft-models for different
piloting-stages, e.g. "How to start the engines", many unique
procedures, up to complete flights.
You can find out weather there is a unique tutorial for your model, just
open "menu-bar
--> Help" and see if there is an item "Start
Tutorial" available!
When following Tutorials,
» it may be a good idea to enable the
TTS-system (see above) in order to hear what the instructor says - so
you can concentrate on what you are doing
» and DISABLE Multiplayer, because your instructor will not be able to
react to them - thus it may confuse you when your instructor tells you
to go through a friend of yours!
Each Tutorial is divided into small tasks, which you should work
through
in sequence. In those Tasks the instructor will explain to you "what
you should do" and then will monitor what you are doing - and of course
will tell you what was good or bad!
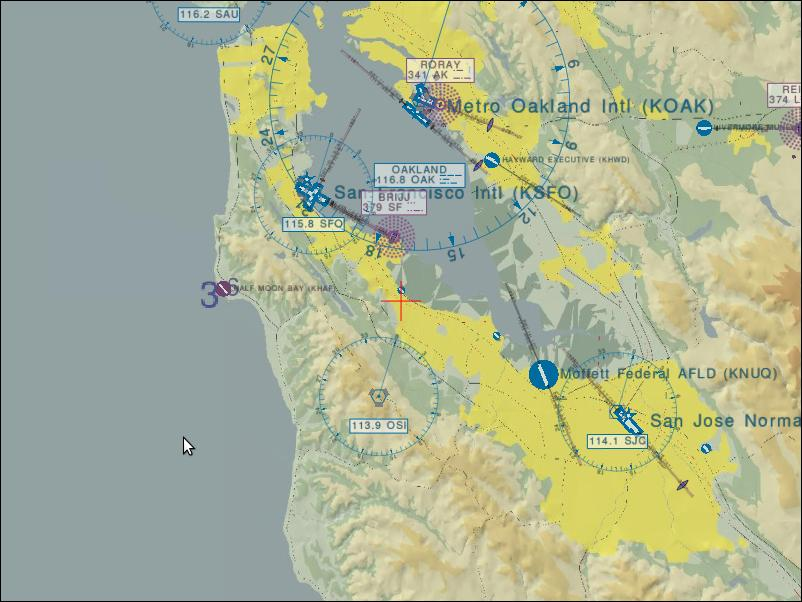
See for example the c172p:
- The Tutorial will always exercise the flights in the Bay-Area of
San-Francisco (KSFO), between the "Half-Moon Bay“ (KHAF) in the West
and "Livermore Municipal Airport“ (KLVK) in the East.
- Just start FlightGear without any unique options (and especially
without Multiplayer!):
- when using FGrun just choose the C172p as aircraft and KHAF as
airport
- without FGrun open a command-window and type:
- fgfs
--aircraft=c172p --airport=KHAF
After FlightGear has started choose: Menu-Bar
→ Help → Start Tutorial:
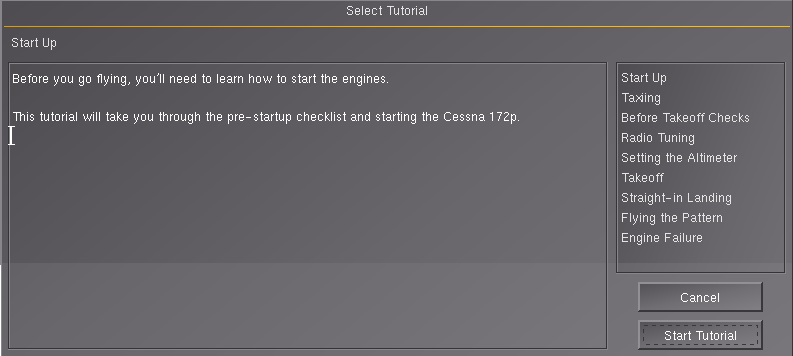
See in the left column the explanations and on the right the available
Tasks
Choose a Task by mouse-click and then click onto the button "Start
Tutorial"
After a while the instructions will pop-up on the windshield of your
cockpit.
So try to understand and exercise what the AI-instructor tells you
|
The following keys should help You:
- "+“
asks the instructor to repeat the last
step
- "p“ you may
always use to pause
(until you key "p" again1)
- and you can escape the KI-Tutorial any time by "Menu-Bar
→ Help → End
Tutorial“
Videos
In the meantime there are a lot of videos available, in which some
(more or less good) pilots exercise and explain some maneuvers. See a
list of available videos on: http://wiki.flightgear.org/index.php/Video_Tutorials