Briefing
|

Ready to start in an Aerostar 700, LOWI, Innsbruck Kranebitten, Austria
|
Starting
the FlightGear Simulator
You can start
FlightGear on 2 very different ways:
- FGrun:
This is the easy way! Here you use a GUI
to just select the wanted Options. FGrun then combines these to a
normal FlightGear command-file and issues that to the system. FGrun
also remembers your last selections and presents those on start-up. You
can save the settings and recall them again - so you can prepare many of
those settings for different events/opportunities. FGrun is already
included in the basic packages for Windows and MAC OS X. If you want to
install it (e.g. on your Linux-System) see http://code.google.com/p/fgcomgui/
for downloading and installation instructions.
- Manual:
Here
you search and define all Options by yourself and type them into a
command-line or command-file. This is the most flexible way of
doing it - but relatively complex and time-consuming
For both of these
ways of starting, you must know something about the most important
"options" - as follows:
The Major Options
You can start FlightGear just by typing "fgfs"
(or clicking onto such an ICON). FlightGear will then start in
San-Francisco on the active runway in a Cessna c172p with running
engines
- just waiting for you to push the throttle.
But you probably will change that default behavior pretty soon - and
you
can do so by defining over 150 options. Some of those you might change
very often (e.g. the aircraft, airport, etc.), some only once in a
while (e.g. the input/output devices you use, etc.) and some only very
seldom - if
at all (e.g. logs, tracers, etc.). In the following we will describe
just the most used ones - a complete list of all options you find in
the appendix.
You define the options you want to use by issuing the start-command
like:
fgfs
--Option1
--Option2 ...
Be sure that those "--"
always are 2 dashes - some system tend to join those
2 to 1 long one -- and that may become your first error for which you
might search for hours or even days! If you have problems preventing
the
system from joining those 2, try to mark that
single one and overtyp it again with the 2 dashes and then DO NOT USE
THE ENTER-KEY but just click
with your mouse somewhere else!
System Options
While FlightGear starts it needs to know some basic informations.
Those are generally set
during installation - but just in case: You can change them any time as options in your start-command:
--fgroot=$FG_ROOT
defines
the directory where the program finds the data (aircraft, etc). You see
already here, that you could place your (big chunk of data) onto some
other disk! Or you may have different versions installed, which you may select with this option!
--fgScenery=$FG_SCENERY
the directory where the sceneries are defined. This basically contains 4 sub-directories:
Terrain: Contains the actual 3D-world-surface including some basic models (like e.g. airport-terrain-generation)
Airports: Contains structural data for runways, taxiways, parking-positions, thresholds, ILS, towers, etc.
Objects: Contains the models to be placed into the terrain
Models: Contains shared models that may be used inside other models (e.g. lights for airports etc.)
--config=path
Some models may ask you to enable some
special functions (open doors, shoot guns, towing a glider, etc.). They
will tell you during installation which
XML-file they require - and you pick that up with this command.
--control=your primary control-unit
Define with which device you will work
most:
With a joystick, mouse or keyboard. Make sure that device is connected
to your system prior to start FlightGear (or FGrun). This is especially
important if that device is a joystick! And be aware that those devices
may interact
with each other! e.g. if you control by Keyboard, but also have a
joystick installed, the "joystick home-position" might not allow you to
change "analog values", e.g. ailerons, speed, etc. by the keyboard!
--language=(de, fr, it, ...)
Starting with FlightGear 2.0 you can
define the language-group you want to use for your FlightGear menus.
(But there are not yet many languages
available! See
all installed translations in your directory: $FG_ROOT/Translation.)
--browser-app=path
In case you have different
Internet-Browsers installed, you define here which one FlightGear shall
use.
Further details you find in "General
Options"
Define the Aircraft
FGrun will
present you a list with all the models installed - but if you do not
use
FGrun (but still want to use other models than just the C172p!) you
have to define at least:
--aircraft=model
For a list of models available see the directory $FG_ROOT/Aircraft (or use the
option
"--show-aircraft"
with your start-command).
Further details you find under "Aircraft-Options".
Define
the Startposition
You may start at any point anywhere on earth - the only restriction
is: You must be able to define that place somehow! And do not be
disappointed if you see just deep blue water after starting - that
would
indicate that you did not yet have the
sceneries installed for that location!
You can define your starting point:
- on an Airport: For that you
have three sub-options:
- Define Airport and
Park-position: This
Option is
the only one matching reality - and should be used each time. But not
all Airports in FlightGear do have designed park-positions yet! If you
do not
use FGrun (which
would list them for you to select)
you can find the
available Park-positions for an airport in the data-file $FG_ROOT/AI/Airports/ICAO/ICAO.parking.xml.For San-Francisco that would be $FG_ROOT/AI/Airports/KSFO/KSFO.parking.xml
- you could define e.g.:
--airport=KSFO --parkpos=B26
- Define just the Airport: In
this case FlightGear
chooses itself a runway that is best fitting according to wind etc.
-- and
by that finds exactly that runway, that everybody uses. And that probably
leads to many bad wishes from
- other pilots just being on short final and suddenly find there
runway blocked by you
- other pilots suddenly sitting with their plane inside your plane
- you could define e.g.:
--airport=KSFO
- Define Airport and Runway:
This
is the worst selection at all, because in addition to the problems with
item 2, you now may even start against the other traffic (and wind) -
that surely will tempt the other pilots to even "worse wishes" against
you! We suggest this solution only in cases were there is a small,
unused runway available - which you leave as son as possible!
- you could define e.g.:
--airport=KOAK --runway=33
Instead of using one of
the last two, it would be much better to use the next option:
- by GPS Data: You
can use MPmap, a normal map, a
Handy with GPS, etc. to get the
Longitude and Latitude and add to that a wanted heading.
- e.g. for KRHV you could define:
--lat=37.334047
--lon=-121.816320 --heading=234
You may find
more details about that location in chapter "VFR
Cross-Country"
- by Navigation-points: These
could be: VOR, NDB,
FIX,
Carrier, airports, etc. If you use a VOR or NDB
be aware that there may be used the same ID for several items. e.g.
there is a "VOR Richmond" with an ID="RID". That same ID is also used
for the "VOR RIED" in Germany, south of EDDF. So you cannot really be
sure where you will show up! You better verify it prior using it!
- you could use the following options:
--vor
or --ndb
or --fix
or --carrier
or --airport
plus --offset-distance and
--offset-azimuth
plus --on-ground or
--altitude=ft
You could e.g. start exactly above the
Fix=HAN85 which is on the
ILS-localizer for runway 21 at EDFH. For the
c172 you might choose an initial speed of 100 kn and the
altitude (according to the
ILS-glideslope specification) shall be 3000 ft.:
- you could define: --fix=HAN85
--heading=210 --vc=100 --altitude=3000
Be aware that some options may
overwrite
others! e.g. "--vc" (velocity) would overwrite a somewhere else defined
"--enable-freeze" which
would stop everything!
Features and
Rendering: (very nice - and very
slow!)
It
is a big advantage that may experts have chosen FlightGear for their
hobby - and that they are constantly improving visibility and rendering
effects
etc. That is wonderful for some users - for others it can result in
problems! Especially if they have an older, not that powerful PC! If
your PC-response-times are getting very
slow check your FPS (menu → View → Display
Option → Show Frame Rate) before and after you
activated/deactivated some of these features (like fog, AI-models,
etc.).
And then test the FPS
somewhere outside in the open country and compare it to e.g. the FPS
over KSFO (San
Francisco) and/or LFPG (Paris France). Especially the city of Paris is
modeled with a whole lot of buildings: That is wonderful because you
can do sightseeing to all the touristic
attraction in e.g. a little Cessna -- but you need a "good" Computer
with a very good Video-Card
to be able to enjoy it!
So watch how many of the Feature
and/or Rendering options you
are activating!
Networking
If you have a permanent Internet connection at your disposal you may be
using many other features (e.g. Multiplayer, FGCOM, etc.) - see the
chapter Features
for that. Further Details you find in the Networking
options
Starting with FGrun
Start
FGrun like any other program in your PC. In case you do not find a
Start-ICON on your desktop and FGrun is also not listed in your
Program-Lists, then verify that FGrun is installed. If installed it
usually resides in the same $FG_PROG-directory
as FlightGear itself. Basically there are two versions of the FGrun:
“FlightGear
Launch Control” for Windows and Unix/Linux
Please see in the following how the major options are set in FGrun for
Windows and Linux - for more
details see:
http://wiki.flightgear.org/index.php/FlightGear_Launch_Control.
After having started FGrun it will first show you the second page!
That sounds odd - but has a good reason: On page 1 there are system
options which needs to be accessed only very seldom! While on page 2
you select the aircraft - which is needed much more often. So:
| To view or change the
"System Options" you first have to press "Prev" on the "Page 2": |
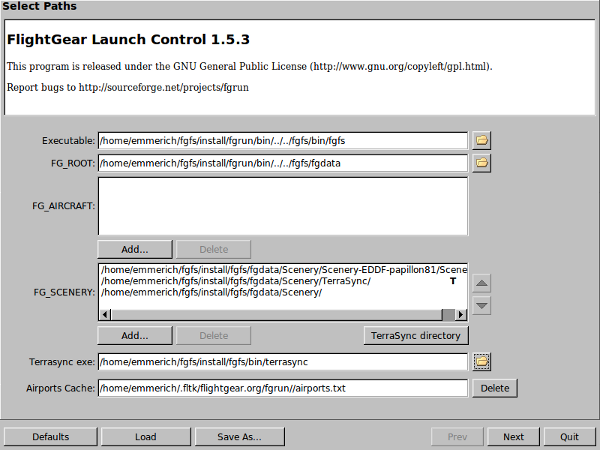
FGrun Page 1:
The variables $FG_ROOT and $FG_SCENERY and $FG_PROG probably have been set
already during installation - otherwise see the definition of those
variables in the part "Installation".
Notice:
The shown FGFS-data are from a LINUX/UBUNTU installation, done with
the "Scripted
Compilation on Linux Debian/Ubuntu",
which makes installation also for LINUX very easy - but does NOT install
according to the LINUX-Distribution standards - so You may notice the
unusually long directory-paths!
Under "Executable"
must be given the standard start-command for FlightGear $FG_PROG/fgfs
In FG_ROOT is the pre-defined variable $FG_ROOT.
FG_AIRCRAFT is not yet used
In FG_SCENERY
you find the variable “$FG_SCENERY”.
Notice that the first entry is a test-version for a new scenery - after
that there is the TerraSync-directory - and only last the standard
FlightGear directory. That is the order in which FlightGear searches
for
any
given piece of scenery! New
sceneries will be downloaded
into the directory marked by "T" -- independent of what you named the
"TerraSync"-directory (of course
you better define the TerraSync-Directory as the one where TerraSync
downloads the new sceneries into!).
If you want to use TerraSync you must define the "Terrasync exe" in its
field - it
should be $FG_PROG/TerraSync.
The "Airports-Cache" defines where FGrun saves a list of
airport-pointers - that usually is within $FG_HOME.
When starting FGrun for the first time it searches in a big database
for all
airports available, to present them to you for selection. Depending on
how
much scenery you have installed, that may take a long time! So FGrun
does it only when it does not find the "airports.txt" at startup. After
you installed new scenery you should initiate a rerun by the
"Delete"-button here -- or by the "Refresh"-button on page
3.
|
| After you clicked
"Next" you are on the following page - which usually is shown first! |
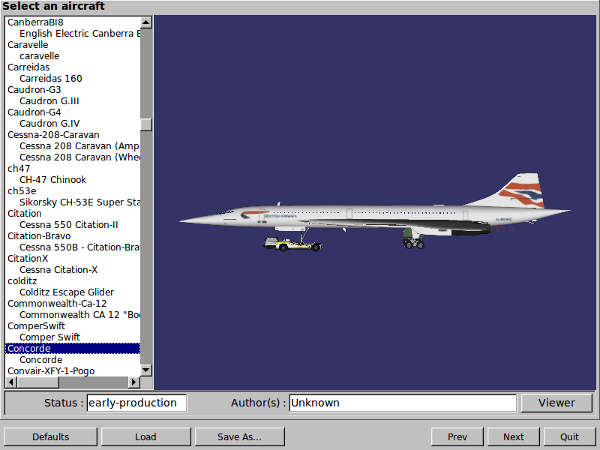
FGrun page 2:
In the left column you select the aircraft you want to
fly.
After selecting you may watch it from all sides by moving the mouse
over it while the left mouse-button is pressed.
Watch the given "Status" in the lower part - that is a definition by
the
designer himself. You should not expect an "error-free model" when the
status is not
"production" or similar.
|
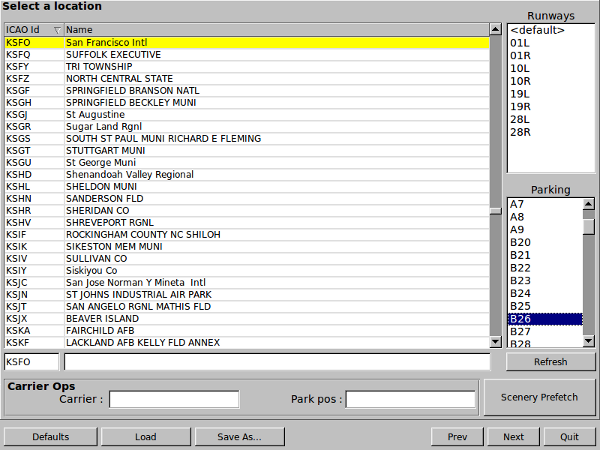
FGrun page 3:
Define the initial airport in the left part of the image (other types of start-locations you find
on the "Advanced" page under "Initial position").
You may either select an "ICAO Id" or a "Name" by mouse-click or you
type
(parts of) the name into the input field under the table - and the
system will search for it.
In the right lower part you select a "Parking"-lot (or Gate or
Terminal). If there is no entry in that "Parking"-list then you may
- select nothing more: Then the system selects a best fitting
runway to pop up on
- or you select a "Runway" in the upper right list.
Remember that you should not use these last 2 Options when flying in
"Multiplayer-mode"! See "Starting Positions"
For the Carrier usage see the Carrier
operations.
If you do not yet have the scenery installed for the wanted airport,
you might use "Scenery Prefetch" to get that scenery prior to start! (Of course you must be connected to the
Internet if doing so!)
|
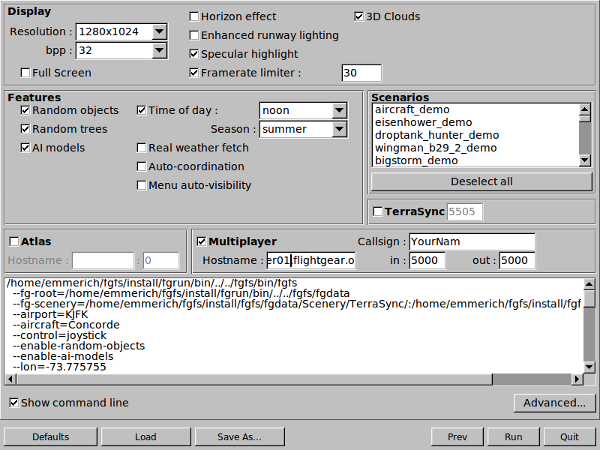
FGrun page 4:
here you define the basic environment:
- Activate "AI models" if "Multiplayer" is activated -
otherwise you will not see the other models!
- Activate "Show command line" to evaluate which options are
defined how (you may use those in case you want to write some special Command-Files).
- Activate "TerraSync" if you want to refresh your sceneries
-
or download new parts "on the fly" (see TerraSync)
- Please enter a unique "Callsign" for your
Multiplayer-sessions!
- If you have performance problems with your PC you may use
the "Framerate limiter". With that the system
will not try to be as fast as possible (and then may get surprised if
workload suddenly rises!). A Framerate of 25 is standard for films - so
I usually use 20 and have some other applications running in parallel! (Even a FPS of 10 is usable!)
Remember: The other options may pull down your system-performance - so
be careful when you have an older system or notebook!
|
|
If
you click "Advanced.." on the previous page, you will be presented
with the following pages.
On those select a header in the left column to go to that sub-page!
|
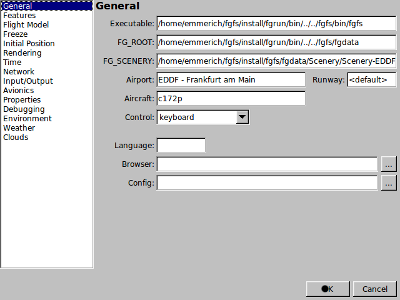 General
(click --options
to see the command details) General
(click --options
to see the command details)
- Executable, $FG_ROOT und $FG_SCENERY
etc. had been set already during installation or on FGrun page
1
- Airport & Parkinglot & Runway
had been set already on FGrun page 3
- Aircraft had been set already on FGrun page 2
- Control: Define which is your prime
control-unit: Joystick,
Mouse, or
Keyboard. Make sure the wanted device is plugged prior to starting
FlightGear!
- Language: Starting with FlightGear
Version 2.0 you can define in
which language the menus will be displayed. See the directory "$FG_ROOT/Translations" for a list
of available
languages. (You are invited
to add more!)
- Browser:
In case you have different Internet-Browsers installed you define here
which one shall be used for FlightGear.
- Config: Some
Models do need special XML-Data for special effects. The
installation-instruction for that model should define what should be
entered here.
|
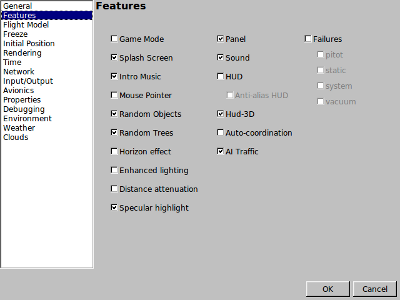 Features
(click --options
to see the command details) Features
(click --options
to see the command details)
Most of these fields will show a PopUP explaining that item,
when you hold the mouse-pointer over it. Just a few remarks here:
- Be careful when using these wonderful options! Some PCs
and/or Graphic-Cards may become overloaded!
- "Auto-Coordination"
may help beginners a lot by not having to control ailerons and rudder
separately. But with it you cannot perform some very useful maneuvers,
like Slip etc.
- AI-Traffic
produces artificial aircraft and air-traffic.
But those are limited to your local PC - in a Multiplayer environment
each user will see some different traffic -- so you switch that off
when having Multiplayer activated!
- "Failures"
allow you to define problems you want to be surprised by during the
flight! It may be easier to set those from inside the cockpit via: "menu
--> Equipment --> failures".
HUD:
Is grouped by itself in the options-list
|
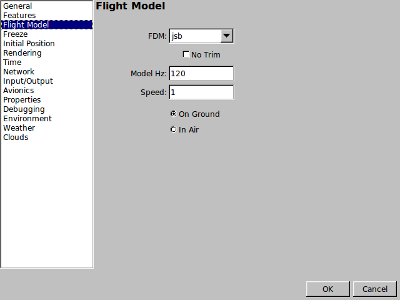 Flight
Model
(click --options
to see the command details) Flight
Model
(click --options
to see the command details)
- Usually the models will define them-selfs which FDM they
need during
start-up.
- So the standard user should not change anything here!
|
 Freeze
(click --options
to see the command details) Freeze
(click --options
to see the command details)
- Freeze starts FlightGear in the
"pause"-mode, i.e. nothing happens unless you free it by keying
"p". Be careful:
Some models will not show up when starting in this mode!
- Fuel Freeze
is a completely unrealistic modus: You can fly forever without burning
any fuel - which is very nice for the environment - but very bad for
your reputation as a pilot! And you will miss some of the fun when
noticing that a fully loaded aircraft behaves drastically different
compared to a
light weighted one! That may shock you some times, especially during
Starts and/or Landings!
- Clock freeze just stops the
Simulation Time. Watch it: Some
models will not function in this mode!
|
|
 Initial
Position
(click --options
to see the command details) Initial
Position
(click --options
to see the command details)
- Watch
it: Whatever you define here will overwrite what you define on FGrun page 3.
Many people (like me) forget
that they defined something here and then
wonder (days later) why FlightGear does not accept the definition of an
airport etc. on page 3 !!!
|
|
 Rendering
(click --options
to see the command details) Rendering
(click --options
to see the command details)
(Hold the mouse over an item to get hint-PopUp's)
These
options define some nice options for how to display things on your
display!
And that
means: It may affect the FPS
of your system -- so you should
watch what happens when you activate those!
|
|
 Time
(click --options
to see the command details) Time
(click --options
to see the command details)
self-explanatory
|
|
 Network
(click --options
to see the command details) Network
(click --options
to see the command details)
- In the upper part you
define ports to interface to other programs, see the --options for details
- The values for "Multiplayer Options"
- Callsign: Your personal
Multiplayer-ID (maximum 7 alphas)
- Multiplay 1: Define a
"mpserverXX", ref. Multiplayer
HowTo
- Multiplay 2: In the center is
either the name or the IP-number of your PC
- Proxy: If you use a Proxy-server
define it here!
|
|
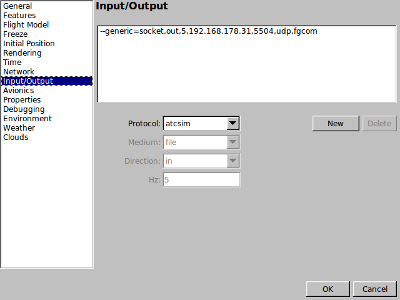 Input/Output
(click --options
to see the command details) Input/Output
(click --options
to see the command details)
Here you define the Interfaces to other applications.
Open the field "Protocol" to see a list of all available options.
Start with selecting "New" (or an existing entry to edit)
then open the field "Protocol" to see a list of all available options.
For FGCOM
you need
--generic=socket,out,10,localhost,16661,udp,fgcom
For Atlas you need
--atlas=socket,out,1,localhost,5505,udp
|
|
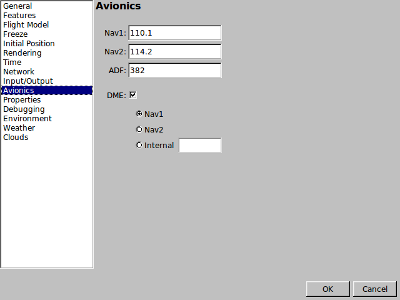 Avionics
(click --options
to see the command details) Avionics
(click --options
to see the command details)
Just define the Navigation Radio-Frequencies.
Notice that you can only preset the "Selected" frequencies - not
(as usual) the "Standby". That way you can preset the Radios direct for
startup!
See the detailed description in the part "Radio-NAV"
|
|
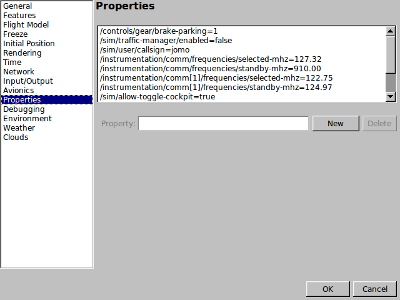 Properties
(click --options
to see the command details) Properties
(click --options
to see the command details)
Properties are all the values that are used/calculated
during the simulation.
In "menu
» Debug » Browse Internal Properties" you can view, change,
trace etc. all those values.
Here you can predefine values, so that those values are as you would
like to have them at startup. e.g.
- Set the Parkingbreak, if you do not like to
start rolling without telling the aircraft to do so
- Disable the AI-traffic if e.g. you start in
Multiplayer mode
- Define your Callsign for AI-ATC usage, this is
different to the one defined on page 4!
- Set the frequencies for your radios
- etc.
To enter a new
value start with "New" -- to edit
click onto the existing line.
|
|
Debugging
(click --options
to see the command details)
The "Debugging Tools" are not commonly used by Users.
|
|
|
"GUI Launcher“ for
Mac OS X
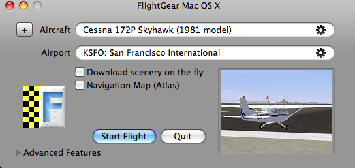 In
Mac OS X
the FGrun looks different from the outside, but is based on the same
principles. Also selecting the options is relatively similar but not
via
4 pages after each other, but selected in parallel from the front-page. In
Mac OS X
the FGrun looks different from the outside, but is based on the same
principles. Also selecting the options is relatively similar but not
via
4 pages after each other, but selected in parallel from the front-page.
The settings of the directories is not of any significance, because the
"GUI Launcher" is completely integrated into Mac OS X. Thus most
settings as on page 1 of FGrun are not needed.
Go to the aircraft-selection by clicking onto the toothed wheel at the
right side of "Aircraft" (similar to page 2 of FGrun).
You could also click onto "Advanced Features" and then select "Aircraft"
Go to the Airport-selection by clicking onto the toothed wheel at the
right side of "Airport" (similar to page 3 of FGrun).
You could also click onto "Advanced Features" and then select "Airport"
under "Positions"
Activate "Download scenery on the fly" to activate TerraSync (similar
to page 4 of FGrun).
Activate "Navigation Map (Atlas)" to activate Atlas (similar to page 4 of FGrun).
With "Advanced features" you reach similar functions like in the FGrun advanced pages.
You then start FlightGear with "Start Flight".
|
Starting
Manually (by Hand!)
There are 4 technical different ways to start FlightGear without FGrun:
- Start-Icon:
During installation there probably has been placed a Start-Icon
onto your desktop and/or a Program-Entry into your Program-menus. You
can just use those and FlightGear will place you in a Cessna
C172p
onto a runway at KSFO (San Francisco). This is a very easy way to start
FlightGear the first few times - but may become boring pretty soon. So
you may want to use an additional Option-File.
- Command-line:
If there are only some options that you want to define, you
can type those (together with the Start-Command) into one Command-Line
and start. But after some time you probably become very tired of typing
all that staff again and again! So you might use the Option-File
for additional options.
- Option-File:
At each start FlightGear is designed to look for this Option-File
when starting. That means you can type all your options into a file -
and just change a few option-settings from time to time. The drawback
here is, that you can have only one Option-File - thus you constantly have to
change that file for different events.
- Command-File:
So you might want to use many Command-Files
instead.
Those are the same as the Option-File, but also include the
start-command(s)! That way you can save as many of those files as you
want, for as many events you want. You may e.g. have 1 file for
casual occasions (which you change whenever needed) and some more which
you just call up for certain occasions/events.
Start with a Command-Line
Windows:
- up to and including Windows XP
click “Start
» Command” and type your Command (with the options) into the
line
popping up.
- starting with Windows Vista
click “Start”
and type into the line popping up just above it.
In case you run into problems, you
might type in that line just "cmd" - that will open a command-window
in which you type your command. Then, when you start, you can monitor also the
Windows processing and see if Windows or
FlightGear have a problem with your commands, as written.
Just to verify that everything is fine, start with a simple command
like e.g. :
C:\Program\FlightGear\bin\Win32\fgfs.exe
--fg-root=C:\Program\FlightGear\data
--fg-scenery=C:\Program\FlightGear\data\Scenery
The
above must be written into ONE line and you must be sure that before
each option there are TWO dashes! Some systems do join those TWO to ONE
on ENTER. If that happens over-type the 1 dash with 2 and then click
with
your mouse somewhere else - that will end the input without changes!
Linux:
Open a "Terminal" (Command-Window) and type the command:
(Watch for the
correct directories! In the following the "/usr/local/bin/" must be replaced by your $FG_PROG !)
The
above must be written into ONE line and you must be sure that before
each option there are TWO dashes! Some systems do join those TWO to ONE
on ENTER. If that happens over-type the 1 dash with 2 and then click
with
your mouse somewhere else - that will end the input without changing!
Open “Terminal.app”
and enter into
/Applications/Utilities
the following 2 commands after each other, e.g.
cd
/Applications/FlightGear.app/Contents/Resources
./fgfs
--option1 --option2 ....
In MAC OS X that are 2 commands in 2
lines! Be sure that
before each option there are TWO
dashes! Some systems do join those TWO to ONE on ENTER. If that happens
over-type the 1 dash with 2 and the click with your mouse somewhere
else -
that will end the input without changing!
Start with an Option-File
As said above: Whenever FlightGear
starts up it looks for a file "
fgfsrc" in which you can write
your options one after the other. Thus you can save yourself lots of typing -
you just type single lines inside this file for different occasions.
In case you usually change only a few options at startup, you could
have all your standard "seldom changing" options in that file - and
start FlightGear with
the start-command and the frequently changing variable options (like e.g.
--aircraft=model --airport=ICAO --parkpos=Ann) - and only the standard options will be written into the Option-File.
- For Windows
this option-file must be named "system.fgfsrc“
and reside in the directory "$FG_ROOT“. That
means you cannot define $FG_ROOT inside this Option-File because
FlightGear needs to know the variable "$FG_ROOT“ in order to find that
file! So you may start like e.g.:
- fgfs
--fg-root=c:\Program
Files\FlightGear\data
--aircraft=model --airport=ICAO --parkpos=Ann
- For Linux this
option-file must be named ".fgfscr“ and
reside in your private directory "~/".
Watch the "dot" in front which makes it to a "hidden" file, i.e. you
may have to tell your "File Browser" to list also hidden files to see
it! So you may start like e.g.:
- fgsf --aircraft=model --airport=ICAO --parkpos=Ann
- For Mac OS
X:
- To my knowledge you do not have that option there - the
FlightGear is always started via the "GUI Launcher"
You generate such an option-file by opening your standard system editor
(for windows the "wordpad"!) and type in the options one after the
other:
| ".fgfsrc“ resp. "system.fgfsrc“ |
--fg-root=/usr/share/FlightGear/data
--fg-scenery=/usr/share/FlightGear/Scenery
--airport=EDDF
--parkpos=B46
--aircraft=SenecaII
--control=joystick
--disable-random-objects
--prop:/sim/rendering/random-vegetation=false
--disable-specular-highlight
--enable-ai-models
--enable-real-weather-fetch
(etc.) |
- Replace the values for
"--fg-root" and "--fg-scenery" with their values according to $FG_ROOT and $FG_SCENERY
- Do not change the "/" in
"-prop:/sim/rendering/random-vegetation=false", those are
"Property-Values" and written the same way for all Operating-Systems!
- Do NOT define those here if you define
them with the start-command -- otherwise they will overwrite those!
Start with a Command-File
The Command-File is the same as the
Option-File - except:
- in addition it includes the start-command itself, including the
path to it
- the file may be saved in any directory you like and may be named
as you like!
according to your Operating System:
- Windows:
- Create the file with the "Wordpad" (do NOT use the standard "Editor"!)
- Save the file as a "*.bat" (e.g. “myFGFS_xyz.bat”,
it must be of type "bat"!)
- Save the file into any directory to which you have read/write
access
- UNIX/Linux:
- Create the file with any System-Editor (do not use
high-sophisticated ones like e.g. "LibreOffice etc.!)
- Save the file by any name you like (we suggest e.g. "myFGFS_xyz.txt" -- for
most Unix-distributions the type of the file does not matter - it is
just a habit of me to make sure I can see on first look what type the
content of the file is!)
- Save the file into any directory to which you have read/write
access
- Make sure the properties of the file define it as "Executable" (Usually a right mouse-click onto the
name, select "Properties --> Security --> Executable")
- Mac OS X:
- To my knowledge you do not have that option there - the
FlightGear is always started via the "GUI Launcher"
- then you start FlightGear by starting this file like any other
program-file (usually: Double-click it!).
See as an example my Command-File, that I used for the
IFR X-Country KRHV to KLVK:
(You could copy
those and just change the upper 3 lines if needed! Or change single
lines to fit your needs/taste!)
| UNIX/Linux:
“KRHV_IFR” |
Windows:
“KRHV_IFR.bat” |
Notes
|
/opt/flightgear/bin/fgfs \
--fg-root=/usr/share/flightgear \
--fg-scenery=/usr/share/flightgear/Scenery \
--geometry=1280x1024 \
--callsign=jomo \
--aircraft=c172p \
--lon=-121.816320 \
--lat=37.334047 \
--heading=234 \
--disable-real-weather-fetch \
--enable-clouds3d
\
--ceiling=750:3250 \
--visibility=1000 \
--wind=270@5 \
--prop:/environment/config/aloft/entry/visibility-m=30000
\
--timeofday=noon \
--enable-ai-models \
--disable-sound \
--generic=socket,out,10,localhost,5504,udp,fgcom \
--multiplay=out,10,mpserver01.flightgear.org,5000 \
--multiplay=in,localhost,5000 \
--prop:/sim/frame-rate-throttle-hz=20 \
--prop:/controlls/gear/brake-parking=1 \
--prop:/sim/traffic-manager/enabled=false \
--prop:/instrumentation/comm/frequencies/selected-mhz=119.8
\
--prop:/instrumentation/comm/frequencies/standby-mhz=125.2
\
--prop:/instrumentation/comm[1]/frequencies/selected-mhz=118.10
\
--prop:/instrumentation/comm[1]/frequencies/standby-mhz=119.65
\
--prop:/instrumentation/nav/frequencies/selected-mhz=114.1
\
--prop:/instrumentation/nav/radials/selected-deg=9 \
--prop:/instrumentation/nav/frequencies/standby-mhz=110.5
\
--prop:/instrumentation/nav[1]/frequencies/selected-mhz=116.6
\
--prop:/instrumentation/nav[1]/radials/selected-deg=114
\
--prop:/instrumentation/nav[1]/frequencies/standby-mhz=116.0
\
--prop:/instrumentation/adf/frequencies/selected-khz=374
\
|
"E:\FlightGear
2.4.0rc5\bin\Win32\fgfs.exe" ^
--fg-root="E:\FlightGear 2.4.0rc5\data" ^
--fg-scenery="E:\FlightGear 2.4.0rc5\data\Scenery" ^
--geometry=1280x1024 ^
--callsign=jomo ^
--aircraft=c172p ^
--lon=-121.816320 ^
--lat=37.334047 ^
--heading=234 ^
--disable-real-weather-fetch ^
--enable-clouds3d
^
--ceiling=750:3250 ^
--visibility=1000 ^
--wind=270@5 ^
--prop:/environment/config/aloft/entry/visibility-m=30000
^
--timeofday=noon ^
--enable-ai-models ^
--disable-sound ^
--generic=socket,out,10,localhost,5504,udp,fgcom ^
--multiplay=out,10,mpserver01.flightgear.org,5000 ^
--multiplay=in,10,localhost,5000 ^
--prop:/sim/frame-rate-throttle-hz=20 ^
--prop:/controlls/gear/brake-parking=1 ^
--prop:/sim/traffic-manager/enabled=false ^
--prop:/instrumentation/comm/frequencies/selected-mhz=119.8
^
--prop:/instrumentation/comm/frequencies/standby-mhz=125.2
^
--prop:/instrumentation/comm[1]/frequencies/selected-mhz=118.10
^
--prop:/instrumentation/comm[1]/frequencies/standby-mhz=119.65
^
--prop:/instrumentation/nav/frequencies/selected-mhz=114.1
^
--prop:/instrumentation/nav/radials/selected-deg=9 ^
--prop:/instrumentation/nav/frequencies/standby-mhz=110.5
^
--prop:/instrumentation/nav[1]/frequencies/selected-mhz=116.6
^
--prop:/instrumentation/nav[1]/radials/selected-deg=114
^
--prop:/instrumentation/nav[1]/frequencies/standby-mhz=116.0
^
--prop:/instrumentation/adf/frequencies/selected-khz=374
^
|
1)
2)
2)
3)
3)
3)
4)
5)
4)
4)
4)
4)
|
Notes: (For a description of all the unique
commands see the Appendix)
- The directory + the start-command for FGFS
- The directories for fg-root
and fg-scenery
- Defining a private "VIP parking lot" (instead of the usual
"--airport= " etc., see above "Define the
Startposition")
- See the "weather cooking" for the "IFR
Cross-Country"
- --enable-clouds3d is
a relatively new option, that may not be in your release yet - and
watch it: It uses lots of your Graphics-Power! But it looks fantastic - see the header for the "IFR
Cross-Country"!
You can create as many Command-Files as
you like with names telling you what they are for.
The
Instruments
Many models in FlightGear may have 2D (2dimensional)
and/or 3D (3dimensional) panels.
The 3D-panels always look much more realistic - but often are less
readable! If both panels are available You can select between
those two with: "Menu
→ View → Display Option →
Toggle 2D Panel“. In the following we use the pretty 3D-Version:
Some
of those instruments you can also set by mouse. For that each
instrument has areas where you place your mouse-pointer to operate
- in the above picture you see those marked with yellow outlines. You
switch those yellow marks on/off by "Ctrl+c". If
there are multiple
areas you usually decrease the values by clicking into the left area -
and increase in the right. Often you can accelerate the setting by
clicking with the center-button (wheel) instead of using
the left button. Some
of the dials can also be set by rotating the mouse-wheel.
Please see in the following the standard instruments for all aircraft,
explained in a basic model like the C172p. And watch especially the
most important of
the most important in the "Golden T": Those
are the ones you constantly have to keep an eye on: 6, 9, 11, 10!
But of course you need to know (and watch) them all: Here they are with their
functions and usage:
- Clock:
Shows always the Simulator-Time, which my be very different to your
"normal time". See the different options in the Appendix-chapter "Time".
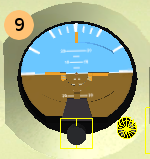
- Suction Gauge
= Shows the "Suction pressure" which is needed for the Gyros in the
"artificial Horizon" (9), "Gyro Compass" (19), etc.
- Filling of the left and right Tanks (inside
the
wings).
- Oil.Temp
and Oil.Press
- Ampere
and Volt
of the power supply (battery, generator)
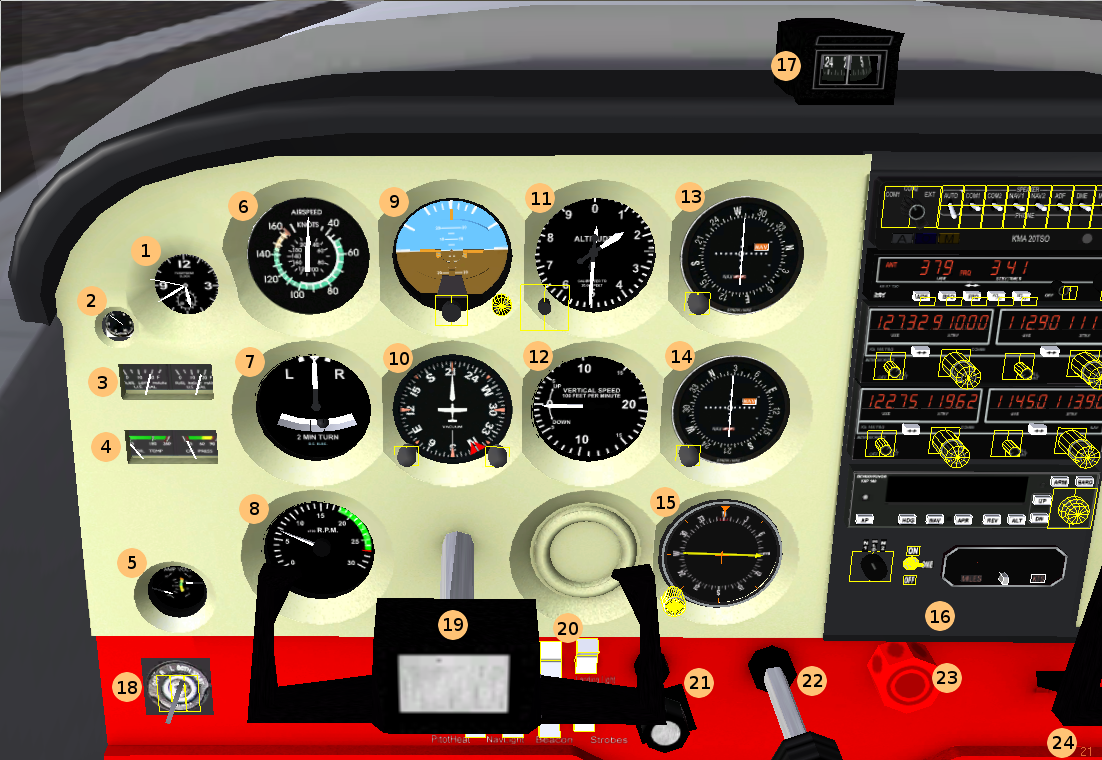
- Airspeed
= IAS (Indicated AirSpeed):
This is the speed within the air, in opposition to the speed above
ground (GS or close to TAS).
Notice
the
typically colored markings:
- white
= never exceed speeds with Flaps
- green
= normal operation area (notice that
with Flaps you may fly slower!)
- yellow
= you are not yet damaging the airframe etc. -- but the engine may
express it's dislike after some time!
- Red
= danger of structural damages (loosening
wings or similar)
|
- Turn
Coordinator
 Indicates the "Rate of Turn" for "L"eft and "R"ight turns. When the
controls (especially Aileron and Rudder) are perfectly coordinated,
then the ball in the lower part will stay in the center.
When you keep the banking on the first scale-line and the ball centered
then you are executing a "Standard Turn" that completes a 360° turn in
exactly 2 Min. - independent of your speed, aircraft or whatever! If the
speed is higher - the
radius and thus the circumference and thus the way to be flown will
enlarge, resulting in the same time
for a complete circle!
Well now: Only the Autopilot will hit that exact time - but the closer
you get to that 2 min., the closer you are to being perfect in
controlled circling! See also the usage in the chapter " advanced
KnowHow".
|
- R.P.M. (Revolution
Per Minute)

Because
there is no Gear-Box the revolutions are the same for the propeller and
the engine!
- While climbing the RPM may be just a little above the green
area
- While cruising (for
longer time spans) the RPM definitely should remain in the
green area
- During
approach and final the RPM is often below the green area
|
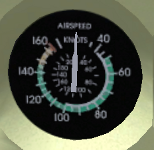
- Attitude
Indicator or Gyro-Horizon
 It's
central position indicates already it's importance: It gives you the
best and fastest indication of the aircraft-status - it surely is the
most important instrument when flying without seeing the real horizon (IFR)! It's
central position indicates already it's importance: It gives you the
best and fastest indication of the aircraft-status - it surely is the
most important instrument when flying without seeing the real horizon (IFR)!
The
line between brown/blue represents the horizon. In the center there
is a little dot, representing the nose of your aircraft. This of course
should always be on that line, as well in level flight as also during
turns. During climb/descent it indicates on the center scale the AoA.
Left and right of that point you
see symbolic wings, helping you to level out.
In the upper part you see how much you are tilted: The first 3 scale
markings are 10° each, then 30°. At the beginning you should stay
within 10-20°!
- With
the black rotary button at the lower edge you adjust the height of the
aircraft-symbol in relation to the horizon. During cruise the wings of
it should be leveled with the horizontal line between blue/brown) -
that way you notice deviations the fastest.
- The button at the lower right
arrests the cage with the gyros etc. to prevent them from getting
damaged during
bad turbulences. Just push the button in when needed -- and do not
forget to restore it afterward!!
|
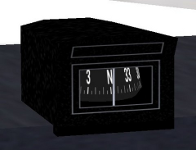
- Heading Indicator or Directional Gyro
 You must correlate this Gyro from time to time with the
magnetic compass (17), because the gyros will deviate over time!
- With the left button you adjust the Gyro to the indication
of the magnetic compass
- With
the right button you adjust the red marker to the
course you want to fly, in order to visualize deviations fast -- and
also as input for the autopilot (if you use it). Watch it: When you
change the setting while using the autopilot, the autopilot will
always turn the shortest distance (<180°)! Thus: If e.g. you fly (as
shown) 280° and change the marker to "150°" the autopilot will turn
LEFT! If you want to turn RIGHT you must go in two stages: First set
the marker to the right (e.g. 60°) - and just before you reach that
heading you set it to the wanted 150! So: If you need to turn into a
certain direction, make sure the turn is not bigger than 180° (or cut
it in pieces!).
|
- Altimeter
 There
are many types of altimeters - here you see one with 3 pointers: The
biggest one for 0-999 ft, the middle one for 1.000-9.000 ft, and the
small one for 10.000-90.000. The altitude shown in the picture is:
00.000+1.000+400 = 1.400 ft!
In the lower left corner you see the rotary button to adjust the QNH, which is indicated in the little
window inside the scale on the right side. You adjust the QNH as follows:
- when on ground on an airport by adjusting the altimeter to
the altitude of the airport
- or by setting the QNH
according to ATIS or
a weather-report, etc. If that QNH scale is not available (or not
readable) you can set it via "Menu
→ Equipment → Instrument Settings → ALT Setting“.
Some words to the technicalities: The altimeter does NOT
really show the "altitude", but the barometric pressure at it.
Just because the barometric pressure decreases with altitude it can
calculate the altitude you are at, if it knows the difference from the
pressure at 0 ft (sea-level) and the actual pressure surrounding you!
So if ATIS (or whatever) tells you
the QNH
(on altitude "0"!) you set that into your altimeter and the altimeter
then calculates the altitude based on the difference between the QNH
and the
actual barometric pressure around you (your plane). Never forget:
The altimeter always calculates the altitude based on "0" (sea level)
-- so there is no indication at all how high you are over ground - to
calculate that (by checking a map!) is the "Pilots-Responsibility" --
and I guess that is YOU!
|
- Vertical
Speed

Indicates the speed by which you climb/descent in feet/minute.
Be aware:
That indication is always pretty much delayed, because the plane first
has to change the altitude to a certain amount in a certain time,
before
the instrument can calculate the difference over time! So: Do not follow the needle
but just control the effect of your doing over time! |
- VOR 1:
See "Radio-NAV", chapter: The NAV-Radio = VOR & ILS
- VOR 2: Is a duplicate to the VOR 1.
- ADF: See
"Radio-NAV", chapter: ADF / NDB
- Radio-Stack:
For all the Radios needed for communication and navigation: See
the chapter: Radio-Navigation
- The "normal“
Magnetic-Compass
This is just a magnetic needle, as it is since some hundreds of years.
It is very, very simple and thus very, very reliable (except that it does not point to the
"Northpole" as shown on maps - but to the "magnetic North", see e.g. http://en.wikipedia.org/wiki/North_Magnetic_Pole)
Watch it: That compass is mounted rather free/movable - so you can
trust your reading only after flying in a rather stable attitude for
some time!
|
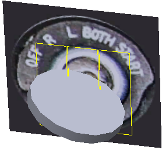
- Ignition Switch :
Click
into the 3 areas or use the keyboard-strokes as follows:
- Center area (="}“)
moves from "OFF“ over "Magneto R(ight)"
to "Magneto L(left)" to "Magneto BOTH"
- Left area (="{“)
moves reverse from "BOTH“ to "OFF“
- Right area "START“ (="s“).
As also in cars you should keep "START" pressed some time, till the
engine rotates freely.
|
- Yoke:
Controls the Elevator and Ailerons
- Electrical
Switches
The yoke makes it rather
difficult to get to those - thus the designers offer you a C172 unique
help: "Menu
→
Cessna C172P → Show/hide
yoke“.
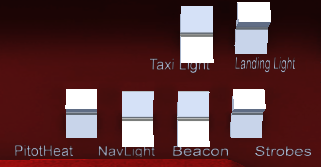
- Taxi
Light: Lightens up the runway - use while taxiing
- Landing
Light: Must
not be used on ground, except during start and landing! Switch it on
when you get the "Clearance to Take Off" and switch it of when reaching
cruising altitude, and reverse - you must switch it "off" when
leaving the runway! It must be "on" when on
approach
and/or in a pattern! Also during daylight!
- PitotHeat:
This
is no light but the heater for the Pitot, which measures the speed of
the air going through it. i.e if there is icing in that Pitot you will
not get a correct IAS-reading!
You should always switch this on during icy conditions, i.e. when the
outside temperature is below 10°C while flying through visible moisture
(clouds, fog, etc.)! You should not activate on ground - at least not
for a prolonged time, because the sensors may melt when overheated!
- NaviLight:
Switches on
the red light on the left wing, the green light on the right wing, and
the white
one at the tail.
- Beacon:
Is
a blinking red anti-collision light. For small planes that is located
on the tail-unit - for big ones there often is one on top and one
underneath the plane.
- Strobes:
That are white
flashlights - to be seen from far distances. They are allowed only in
the air (never on ground!). Also they must be switched off when flying through clouds and similar!
|
- Carburetor
Heat
is used in piston-powered light aircraft engines to prevent or clear carburetor icing. See http://en.wikipedia.org/wiki/Carburetor_heat.
- Throttle
is to control the amount of gasoline fed into the engine. See http://en.wikipedia.org/wiki/Throttle
- Mixture

This
is comparable to the choke in cars. You change the air/gasoline
mixture, because the air-density changes when climbing/descending!
Watch the RPM and speed: When that drops (without obvious reasons!)
you should try to adjust the mixture (see part 5 chapter Mixture). Usually you will
see a serious change starting above 7000 ft, depending on the weather.
And be sure: As well as within a car you can stall also an
aircraft-engine with that. Actual that is the preferred method to
switch off the engine (intentionally, on ground!)
|
24. FPS- (Frames
per Second)
You may monitor the
FPS by activating "
Menu → View
→ Display Options → Show Frame Rate".
The HUD (Head Up Display)

|
FlightGear
also provides a HUD (Head Up Display) . HUDs are generally found in
military aircraft and some very advanced jets. However, FlightGear
allows you to use a HUD in just about all models.
To activate the HUD, press
"h". Multiple "h" will then
change the color, and finally switch off the HUD.
Typing "H"
will change the brightness of the display.
Using "i"
and/or "I"
will change the size of the display.
|
The HUD shown above displays all main flight parameters of the
plane:
- In the center you find the pitch indicator (in degrees)
- with the
aileron indicator above and the rudder indicator below.
- and the elevator indicator the left of the pitch scale
along with a pitch trim indicator. On the bottom there is a simple turn
indicator.
- At the top you see the actual heading
- to the left and right of it the position in longitude //
latitude
- in the very top left there may be shown the waypoints and other
informations from the Route-Manger
- There are two scales at the extreme left regarding the speed:
- The inner one displays the
speed (in kts)
- while the outer one indicates the position of the throttle.
- The two scales on the extreme right display your height
- the left one
shows the height above ground in fee - i.e. it should be "0" when on an
airport
- while the right one displays the height
above sea-level feet (i.e. according to the QNH).
Keyboard, Mice,
Menus and Joysticks
In the following we will introduce you to the available controls for
operating the Simulator and/or the models.
You find a short summary of the keyboard- and mouse-controls also on http://www.flightgear.org/Docs/FGShortRef.pdf,
which you can download and print.
If you did already start the simulator you can also view those codes by
opening "Menu
→ Help → ...“
and then:
→ "Basic Simulator Keys“ are the ones
dealing with the Simulator
→ "Common Aircraft Keys“ are the ones fitting all models
→ "Current Aircraft Keys" are special for that unique model you are
sitting in right now
After you start a new model look if there is a new item in the
menu-bar, usually with the name of your model. There may be given some
very
interesting hints to operate that unique model!
Keyboard-Controls
You could fly all models just by using the keyboard - but for
manipulating the analog controls (e.g. ailerons, rudder, elevator) you
may want to use mouse-support. But even better would be a
joystick. But whatever you are using: The keyboard-codes will always be
available in addition! And for many actions the keyboard remains the
only input-device.
These key-bindings are not hard-coded, but user-adjustable. You can
check and change these setting via the file keyboard.xml
which can be
found in the $FG_ROOT. This is a
human-readable, plain
ASCII file. Although it’s perhaps not the best idea for beginners to
modify this file, more advanced users will find it useful to change key
bindings according to their wishes, e.g. to match other simulators. But
be very careful: In that case your simulator and models will react
different to others - i.e. you might not be able any more to compare
problems in your operations with that of your friends, forum, etc.!!!
If you are not afraid of that, here is an example:
You find in $FG_ROOT/keyboard.xml the following:
| Code: |
Explanation: |
<key n="33">
<name>!</name>
<desc>Select first engine</desc>
<binding>
<command>nasal</command>
<script>controls.selectEngine(0)</script>
</binding>
|
33 is the ASCII-Code for "!“,
that is the technical code send by your keyboard
That is just to tell you
(user) what it usually stands for
Describes the functioning plain words (see e.g. the chapter "Control the Engine".
Start of the Execution Command
Tells where to find the predefined command (see $FG_ROOT/Nasal)
controls = is the filename
(+.nas) » "controls.nas“
selectEngine(0) = is the
name of the used routine inside the controls.nas
End of the command
The END (started with "<key..>"
and ending with "</key>"!
|
You could:
- only change the ASCII ("33") to any ASCII you like - and after
reboot that newly defined ASCII will select the first engine
- for your own benefit you
should also change the describing <name>!</name> to the now related letter
- the former "33=!" will just
type a "!" when keyed in - FlightGear does not care any more
- or you change the inside of <script>...</script> to
tell FlightGear another routine to execute
- for your own benefit you should also change the
<desc>...</desc> accordingly
And whenever any
errors pop up (soon - or in some years):
Remember that you
changed the
Code -- and also FlightGear or a unique model may rearrange that Code
in
some future!
Keys
to control
the Aircraft
- Be sure that the FlightGear-window is in focus
- then use the NumPad-keys when Num-Lock is on
- or the "normal" keyboard-keys
NumPad
|
normal
key
|
Action |
9/3
4/6
8/2
0 / Enter
5
7/1
|
Bild
▲/▼
←→
↑↓
Insert / Enter
(none)
Pos1 / End |
Throttle
Aileron
Elevator
Rudder
center all
Elevator Trim |
Keys
to control the Engines
| Key |
Action |
!
@
#
$
}
{
~
|
Select 1st
engine
Select 2nd engine
Select 3rd engine
Select 4th engine
Decrease magneto on selected engine
Increase magneto on selected engine
Select all engines
|
s
M/m
N/n
|
Fire starter on selected
engine(s)
Lean/Enrich selected engine mixture
Decrease/Increase selected propeller RPM
|
Keys to control the View-Direction
NumPad
+UpCase
|
Action |
8
7
4
1
2
3
6
9 |
Forward
Left/forward
Left
Left/back
Back
Right/back
Right
Right/forward |
Keys to
control the Field of View
| Key |
Action |
Shift-P
c
Shift-
S
Shift-F5/F6
Shift-F7/F8
Shift-F3
Ctrl-c
i/I
h/H
|
Toggle instrument panel
on/off
Toggle3D/2D cockpit (if both are available)
Shift the panel in y direction
Shift the panel in x direction
Read a panel from a property list
panel/cockpit hotspot visibility
Minimize/maximize HUD
Change color of HUD/toggle HUD off
forward/backward
|
x/X
v/V
Ctrl-v
z/Z
F10
|
Zoom in/out
Cycle view-modes forth/back
Reset view direct to Pilot-view
Increase/Decrease visibility (fog)
Menu on/off
|
Keys to control the Auto-Pilot
FlightGear supports 2 types of Autopilots:
- a "common one" which can be used for about all models, even if
that
model in reality does not have an Autopilot
- and "model-unique ones" that may be operated with different
menus, keys, mouse-options, etc.
For the "common ones" you can use the following keys (that may or may not work also on the
"unique" AP!)
| Key |
Action |
Ctrl+A
Ctrl+G
Ctrl+H
Ctrl+N
Ctrl+S
Ctrl+T
Ctrl+U
Ctrl+F6
Ctrl+F11
|
Toggle altitude lock
Toggle glide slope lock (NAV 1)
Toggle heading hold
Toggle NAV 1 lock
Toggle autothrottle
Toggle terrain follow (AGL) lock
Add 1000 ft. to your altitude (emergency)
Toggle autopilot heading mode
Autopilot altitude dialog
|
Ctrl+T controls
your model like a "Cruise Missile“.
Ctrl+U may
save you in an emergency!
With
an active AP the following NumPad-keys change their function:
| Key |
Action |
8/2
4/6
9/3
|
Altitude adjust
Heading adjust
Autothrottle adjust
|
Other Keys
| Key |
Action |
B
b
g/G
, (comma)
. (dot)
l (el)
][
|
Toggle parking brake
Apply all brakes
Raise/lower landing gear
Apply left brake (useful for differential braking)
Apply right brake (useful for differential braking)
Toggle tail-wheel lock)
Extend/Retract flaps
|
p
a/A
t/T
shift+F2
shift+F1
F2
Esc
/
|
Pause Sim
Simulation speed up/slow down
Clock speed up/slow down
Save current flight to fgfs.sav
Restore flight from fgfs.sav
Save screen shot
Exit program
ShortCut: "Menu/File/Browse
Internal Properties/"
|
Mouse-Controls
In addition to the common mouse-actions like e.g.:
- select a menu-item
- activate certain functional areas (buttons, areas, etc.)
- open the "property-menus"
- etc.
FlightGear activates 2 different mouse-modi to be used:
- "Normal mode“ - as usual
- "Control mode“ - controls the aircraft like
a joystick
- "View mode“ - allows fast changes in viewing
directions
You change between
the different modes by clicking the right mouse-button.
(Sorry enough: By doing that you do loose the "normal" functions of the
right
mouse-button, e.g. open properties)
Normal Mode → Mouse-Pointer: Normal
(arrow-pointer)
In this mode the mouse functions as usual - except: You cannot use the
right button as used to in standard applications!
Within FlightGear you use the left button as usual to activate buttons,
controls, etc. But often you might not see where to click to operate a
certain unit! In order to help, you might press "CTRL-c" - that
will show the "hotspots"
marked by a yellow outline. In those you can:
- change the state of a control-element by clicking into that
"hotspot" with the left mouse-button
- operate specially secured elements by clicking with the
center mouse-button (or wheel)
- rotate dials with the mouse wheel
- for
most dials there are also 2 areas to rotate left/right by "clicking",
those usually react slow with normal mouse-clicks and fast with clicks
of the center mouse-button (or wheel)
Control Mode → Mouse-Pointer: +
In control mode you can control the aircraft controls by moving
the mouse. This mode is indicated by a cross-hair mouse cursor.
In this mode
- moving the mouse left/right controls the ailerons
(rolling the aircraft)
- moving the mouse forward/backward controls the elevator
(changing the pitch of the aircraft)
- holding the left mouse button down changes the behavior so that
- moving the mouse left/right controls the rudder
- holding the middle mouse button down
- and moving the mouse forward/backward controls the throttle.
- finally, the scroll-wheel may be used to set the elevator trim.
This mode is particularly useful if you do not have a joystick, as it
provides much better control of the aircraft than using the keyboard.
If you intend to use the mouse to control the aircraft regularly, it is
recommended that you enabled auto-coordination, so the ailerons are
linked to the rudder. This can be done using the option --enable-auto-coordination
(see Starting the FlightGear
Simulator).
Viewing
Mode → Mouse-Pointer: <=>
One
more click with the right mouse-button brings you to the Viewing-mode.
This mode is indicated by a double-headed arrow cursor.
In this mode
- simply moving the mouse changes the view into that direction.
This is particularly useful for looking around the cockpit, or out a
side window.
- the scroll-wheel can be used to zoom in or out.
- clicking the left mouse button resets the view
back to its initial position, usually straight ahead
- holding down the middle mouse button and moving the mouse allows
you to move the viewpoint
itself left/right and up/down
- moving the mouse while both the middle button and Ctrl are held
down allows you to move the viewpoint forwards and
backwards
One more click with the right mouse-button brings you back to the
"Normal mode".
The Menu-Bar
The menu bar provides access to a variety of options for the
simulator and the aircraft. In addition many aircraft have their own
menu items,
e.g. from just changing their registration to automatically starting
its
engines, opening doors, Carrier-Hooks, etc.. Those can be found at the
end of the menu bar, usually under
the name of that aircraft. But also under "Help" you may find unique
parts for the model you currently use.
To display or hide the menu bar, press F10. When
hidden, you can
display the menu automatically by moving your mouse to the top of
the screen.
The menu bar provides the following menus and options:
File
- Reset (Shift-Esc):
resets the flight to the selected starting position. Comes in handy for
a retry if
you get lost or something goes wrong.
- Screenshot
(F3): Saves
the actually shown FlightGear-Window into a "fgfs-screen-XXX.jpg" file.
This picture
also contains all open PopUps and also the File-Select menu.
- you may predefine the
location to save by a "--prop"-option. e.g.
- --prop:/sim/paths/screenshot-dir=YourDirectory
- In case you forget where you saved the files, you find that
pointer in:
- "/" --> sim/paths/screenshot-dir/screenshot-last
- ("/" = shortcut for "Menu/File/Browse
Internal Properties/")
- Sound-Configuration: Configures
the volume for various sound channels, and whether they are heard
outside the aircraft. That does NOT include the sounds of feature
programs like FGCOM, Festival, and alike.
- (Browse Internal
Properties:
These are shown since FlightGear version 2.0 under "Debug")
- (Logging: This is
shown
since FlightGear version 2.0 under "Debug")
- Quit (Esc): This is
the "orderly end of session" saving the actual options/settings prior
closing.
If you use the "X" in the Window-Bar all new options/settings set in
this session will just be lost.
View
- Display Options (since
Ver.2.0): Configures various display options, including whether the 2D
panel, frame rate and chat messages are displayed.
- Rendering Options: Configures
various graphical features. This allows you to trade eye-candy (such as
shadows, 3D clouds and specular reflections) for frame-rate. To help you
achieve a good balance, enable the “Show Frame Rate” option in the
Display Options menu, which will show the current frame-rate in frames-per-second
in the bottom right of the screen. Most people find a frame-rate of
around 20 FPS
adequate for flying. The frame-rate is affected by the
graphical features you have enabled, the current visibility (set by Z/z), the number
of objects in view and their level of detail (LOD).
- To test your settings fly somewhere over the ocean and check
the FPS.
Then do the same flying in a very busy, much modeled area like e.g.
KSFO,
LFPG, or fly over the area of the City of Paris/France, etc., and check
again.
If the FPS drops below a usable rate try to reduce the options and/or
limit the FPS, e.g. to 20 frames/sec. (Even
10 FPS may be acceptable)
- View Options: Defines
which views you can select with "v“/"V“.
- Cockpit View Options:
Configures the view within the cockpit, the pilot’s head movement,
black-out due to high G (gravitation forces), and red-out due to
negative G.
- Adjust LOD
Ranges (Level Of
Details): Sets
the range at which different levels of detail are displayed. This
affects the textures and objects displayed in the simulator. The
standard settings are:
- up to 1 mile you see all details
- up to about 5 miles you see just the contour of the models
- up to about 15 miles you just see shadows of the objects - i.e.
you see there are coming mountains - but you have no idea how
high,
where there are valleys. etc.
- Adjust View Position: This
gives you three buttons, that allow you to move your "point of Viewing"
from. Adjusting it here is rather inaccurate - smaller steps you can
adjust by using the mouse (see there).
And very precise you can set those in the "menu »
Debug » Browse Internal properties",
see the "/sim/currentview“
with the values x-offset-m,
y-offset-m, and z-offset-m.
- Toggle Glide Slope Tunnel: Displays
a virtual tunnel to guide you down to the runway on a normal approach
path. Useful if you are training setting up your approach for landing.
- Instant Replay: This is
a very nice feature to reevaluate
whatever you have done (good or bad) just before. Here you set the
time-span that will be saved constantly and that you can replay
whenever you want.
- Stereoscopic View Options:
Configures stereoscopic display, using Red/Green glasses or other
display methods.
Location
- Position Aircraft (in air) positions
the aircraft at an arbitrary point in the air. You must select a known
ground point, e.g. an airport, VOR, long/lat coordinates, and a
position relative to that point, e.g distance, direction, altitude. You
can also set your initial speed and heading. This is useful for
practicing approaches. (Also
see the WIKI http://wiki.flightgear.org/index.php/Initial_Starting_Positions)
- Select Airport from List positions
the aircraft at an airport. You can search amongst all the airports
that you have installed. Clicking "Apply" will place you at that
airport
on a runway appropriate for the current wind.
- Random Attitude: Sets
the aircraft with a random heading, speed and attitude. Useful for
practicing recovery from unusual attitudes.
- Tower position: Moves
you directly to the tower of your choice - but without your aircraft.
So if you are at EDDF/Germany you can just have a look on what is going
on at
KSFO/USA. Again:
Only your view changes to that location, and thus you can only use the
"View-Options": "Tower View" and "Tower View Look From".
- When you select "Preset" you will be reseated back into your
aircraft.
Autopilot (AP)
This
menu is only available for aircraft that have the default autopilot
configured. Some aircraft may have their own autopilot which is
configured through the panel, in which case this menu is disabled.
- Autopilot Settings
configures the aircraft autopilot. You can set the autopilot up in a
variety of different ways - from simply keeping the wings level, to
following an ILS.
- Route Manager generates
the route (list of waypoints) for the autopilot. Waypoints can be
airports, NAV-aids,
or fixes. The heading, distance and time to the current waypoint may be
displayed in the HUD.
- Pop Waypoint: Removes
the top waypoint from the route list.
- Clear Route: Clears the
complete current route.
- Set Lat/Lon Format:
Toggles the HUD Latitude/Longitude format between decimal minutes and
seconds.
Environment
- Global Weather shows the
current weather. You can change the weather scenario between various
general weather scenarios, configure weather manually, or use the
weather reported by the closest weather reporting station (usually an
airport) via METAR.
- Local Weather allows you
to place individual clouds anywhere you wish.
- Local Weather Tile
configures specific weather scenarios in the local area, which may
change over time.
- Local Weather Config
allows you to fine tune local weather settings for performance.
- Time Settings allows you
to set the current time in the simulator, speed up the simulation, and
change the rate at which time passes in the simulator. Also displays
UTC and local time.
Equipment
- Map: displays
a moving map, showing airports, navigational beacons etc. There is a
description to it in chapter MAP in Part
RNAV.
- Stopwatch
displays a simple stopwatch. Useful for instrument approaches. (Prior
ver. 2.0 this was located under "Debug")
- Fuel and
Payload allows you to set the fuel and current payload within
the aircraft. Only available on some aircraft.
- Radio
Settings (F12) sets the frequencies and radials being
used by the radios and navigational equipment. For details see the part "RNAV
- Radio Navigation"
- Instrument Settings
allows you to set the "Altimeter Pressure" and "Heading Indicator
Offset".
- Random
Failures allows you to configure
- MTBF = "Mean Time Between Failures“ -- e.g. "happens every 1
hour"
- MCBF = "Mean (start/stop)
Cycles Between Failures“ -- e.g. "happens every 3rd flight"
- System
Failures configures random failures of aircraft systems, such as
e.g. the vacuum system.
- Instrument
Failures: configures random failures of specific aircraft
instruments.
AI =
Artificial Intelligence
The former "ATC/AI" was changed drastically since version 2.0. For
details
see http://wiki.flightgear.org/index.php/AI_Systems#ATC.2FAI.
The new sub-menus are:
- Traffic and Scenario Settings: For
many simulations you may want to use predefined Scenarios to operate
in. Here you have now the possibility to set those scenarios when you
do not use FGrun to start FGFS! But after setting the options here
within the FGFS you must restart FGFS to activate them! So: If you have
FGrun available you may rather set them there!
- ATC Services in Range: This enables you to select any (installed) airport by it's ICAO and view all it's Radio-frequencies,
- Scenario
Select: Configures the
active AI scenarios. Note that this will only take effect after the
simulator is re-started.
Multiplayer
This item is deactivated if you are not connected to a MP-Server via
Internet!
- Multiplyer Settings:
- "Hide replay ...:" Activate this, if you do not want to see
"replays" of other pilots (compare under "View" the option "Instant
Replay")
- "Show AI Traffic ..." This is a new Option to disable the
"AI-Traffic" -- especially nice: This works imidiately - you do not
need to restart FGFS to activate!
- already available since version 2.0: Here you may
- change your MP-UID
- and your MP-server
- without the need to restart FGFS --> you only need
to restart the MP-services with the "disconnect" and "connect" buttons!
- Chat Dialog:
Opens a dialog-window with
- a list of the last messages exchanged between the Multiplayers
(in an area of 100mi radius)
- an input field to type and send a message to others. The system
will automatically add your Multiplayer-ID in front - so you should
start the message with the ID of the addressee and then type the
message.
- Chat Menu
(-): allows
you to send common chat messages to other aircraft in the multi-player
environment. Some menus contain sub-menus of options. See examples of a
usage in the parts "VFR Cross Country" and "IFR Cross Country"
- Pilot
List: Opens a list of all Multiplayers in a radius of 100 mi.
That list contains the Pilot-ID,
his aircraft, his
altitude,
the distance from you to him, and the heading to him (so you can try to
meet him). Starting with version 2.0 there is a field that neglects a
"non wanted pilot" in the list - so he might not bother you any more!
- MPCarrier
selection: (new in Ver.2)
displays a list of the available MPCarriers in an area of 100 mi.
Debug
This menu contains various options outside the scope of this guide.
Here
we will only list those entries, which had been included under "File"
prior to FlightGear version 2.0:
- Browse
Internal Properties:
All values that are used during the simulation are listed here in a
structure similar to File-Directories. You can navigate in that
structure as usual. You can view, change, and trace all values from
here (but it may happen that a value
will be changed back again very soon -- if it depends on other values!).
In order to:
- Change: Click
the wanted value - that will be copied into the input-filed at the
bottom - where you can change it. Hit "set" or "Enter" when ready
- Trace: Click
onto the wanted value while the Shift-Key is pressed - the trace will
be shown in the upper left corner of the FlightGear-window
- Binary
Values may be flipped by clicking while "Ctrl" is pressed
- Logging: Will
bring up a PopUp in which you can define
- the name under which that log shall be saved
- which values shall be logged
- the time-intervals between the loggings
- which type logging shall be performed
Help
- Help opens
the help system in a browser window.
- Aircraft Help
displays informations specific to the aircraft
- Joystick
Information displays
informations about any joystick in use, including axis and button
assignments. This menu is disabled if no joystick is attached! See a
description in the following chapter "Joystick
Support"
- Basic
Simulator Keys lists the basic keys for controlling the
simulator. See a detailed list also in chapter Keyboard-Controls
- Common
Aircraft Keys lists the basic keys for controlling the
aircraft. See a detailed list also in chapter Keyboard-Controls
- (Toggle Glide Slope
Tunnel: Is now listed under "View")
- Current
Aircraft Keys shows
unique keys for the active model and/or additional informations for it.
- Start
Tutorial allows you to
start an "In-Simulator" tutorial for the current aircraft. This is only
available on some aircraft. For more informations see the
feature AI-Instructor.
Joystick-Support
Could
you imagine a pilot in his or her Cessna controlling the machine with a
keyboard alone? For getting the proper feeling of flight you will need
a joystick, a yoke, rudder pedals, some external engine-controls would
be nice too, even a complete "real" cockpit with Pilot-seat would be
nice - right?
However, the combination of numerous types of joysticks, flight-sticks,
yokes, pedals etc. on the market for all the different Operating
Systems and manufactures, makes joystick support a non-trivial task in
FlightGear.
Not the smallest problem is always listing all possibilities - so I
will make it ease for myself: Throughout this book
we
will use the name
"joystick" for all of those externally connected controls - independent
of
their function and handling! (With the exception of keyboard and
mouse!).
For the technical aspect FlightGear has an integrated joystick support,
which automatically detects
any type of "joystick" attached to the PC and detected by the Operating System.
In
order for this joystick auto-detection to work, a joystick bindings
XML-file
must exist for each joystick. This file describes what axes and buttons
are to be used to control which functions in FlightGear. The
associations between functions and axes or buttons are called
“bindings”. FlightGear includes several such binding-files for several
joystick
manufacturers in folders named for each manufacturer. For example:
If
you have a "CH Products" joystick, look in the folder
$FG_ROOT/Input/Joysticks/CH
for a
file that might work for your
joystick. If such a file exists and your joystick is working with other
applications, then it should work with FlightGear the first time you
run it. If such a file does not exist, then we will discuss later how
to create such a file by cutting and pasting bindings from the examples
that are included within FlightGear.
Just try the following Test! If this does work
for you, lean back and be happy!
Testing the Joystick
You can see what FlightGear has
detected as your joystick by selecting Menu
» Help » Joystick Information. e.g.:
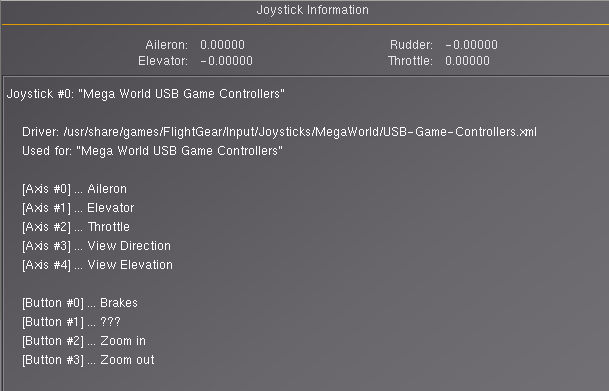
- A joystick was detected! That means your Operating System
did find an appropriate system-driver and also FlightGear did find a
fitting XML-Bindings-File
- There is only one joystick connected - and that has the
ID-number "0" (computers start counting with "0", not "1" like we
humans!)
- The joystick did identify itself as "Mega World
USB Game Controlers“. This name is hardwired inside the joystick
itself and is transmitted during the "handshaking routine" between
system and joystick.
FlightGear also tells us which XML-Binding-file it found for that
stick: $FG_ROOT/Input/Joysticks/MegaWorld/USB-Game-Controlers.xml.
(in this example you see a
directory-structure as is typically for Linux -- for Windows the
beginning of the stream will look different)
- The joystick has:
- 5 analog controls: "Axis #0" to "Axis #4"
- 4 digital controls: "Button #0" to "Button #3"
- Because they are listed we know that they are functional
- even if we might not like the function that is assigned
to it (we can change it if we want!)
- and yes: Also "Button #1" has a correct assignment! The
designer of the XML-file just forgot to tell us what it is (e.g. "<desc>view
cycle</desc>") - but that is just a "nice to have" info for
us humans - the system does not care about it! You can
correct it if you want!
- None of the "Axis" is outside its "0-position". Just try
it: Move your joystick a little and watch the numbers changing in the
upper part of the window.
- Sorry: But you cannot test the buttons as easy!
|
Based on that you
can decide
- if there is an error
- if the assignment is as wanted (if the designer did care to tell
us (see "Button #1")!)
If anything needs
to be debugged or changed or if you just want to know more about it,
got
to: http://wiki.flightgear.org/index.php/Joystick.
Otherwise just use it and be happy!