Advanced KnowHow
|
|
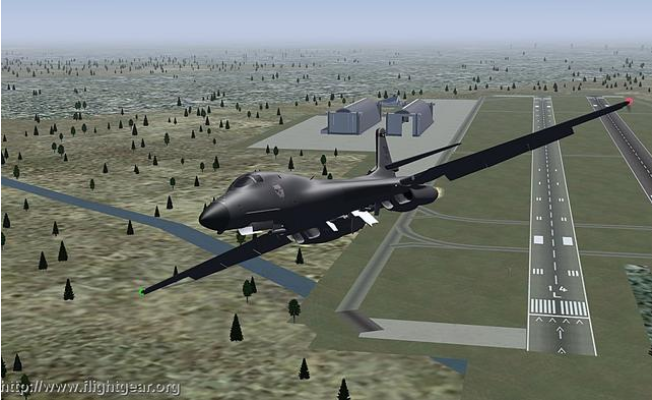
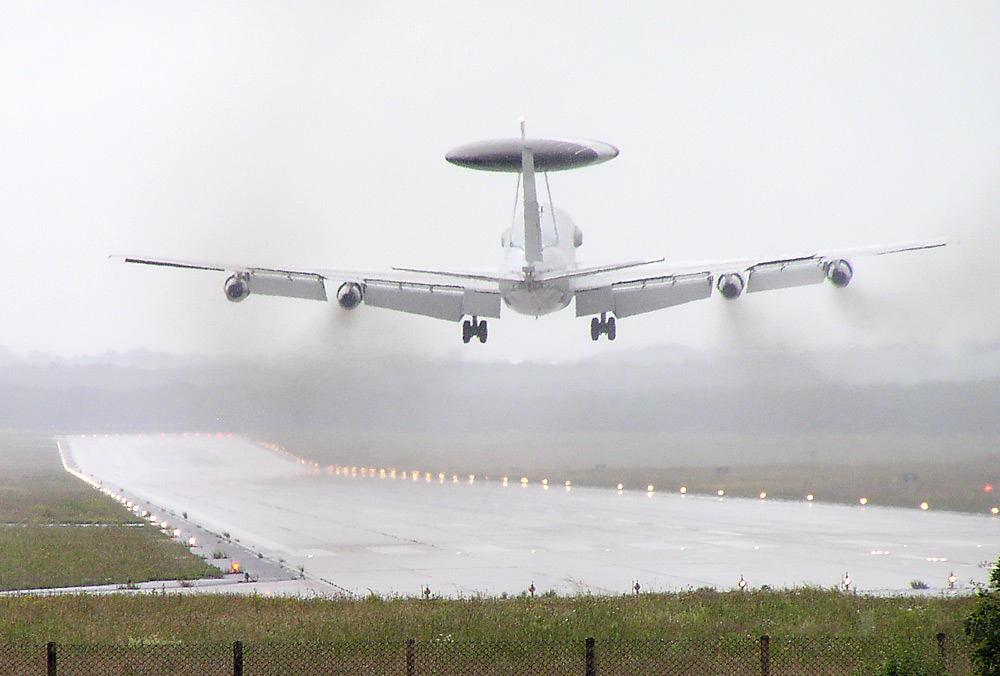
A B-1B starting from KNUQ, Moffet Federal,
San-Jose, California, USA
|
Theories: Why What!
After we proved that you can fly, let us see "why you did what you
did" - and how you can improve!
May be you still believe that the motor is pulling the aircraft into
the
direction you point at with the nose/propeller, i.e. dropping the nose
a little makes you lose altitude and raising the nose a little makes
you gain altitude.
You may think this is quite straightforward. This is not the best way
to think about it. That model would be fine for a rocket, but not for
an airplane. A rocket is
lifted by its engine, while a plane is lifted by its wings. That’s a
huge difference.
Similar with turns: You may think an aircraft just follows the
rudder
like a car follows the direction given by the front-wheels, that you
define by the steering-wheel (which
looks similar to a Yoke)!
But if you ever tried turning a car on ice, you probably noticed that
there needs to be
something else than just turning the wheels! For a car that is
called the "road
grip", i.e. between the street and the tires! But there is no such
thing in the open skies - so we need something else to juggle our
attitude to the surrounding air - we call that "Lift"!
So we do similar movements by car and aircraft - but we need different
kind of forces for it. Let us see just a little
piece of theory that might help us to
understand those. We will not teach the "Theories of aeronautics" -
there
are lots of books available for that. For this basic manual just a few
basics will do!
Interacting Forces
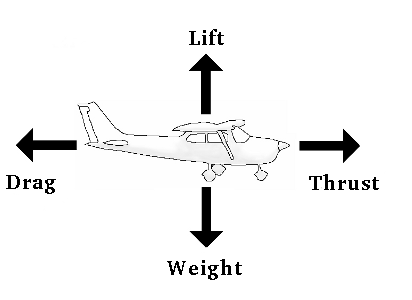 |
Let us compare the required
forces for a car and for an aircraft:
- Lift
|| Weight:
The vehicle + payload + fuel + pilot(s) + passengers have some weight,
which have to be neutralized in order to not climb or sink.
- For a car that is done by the
pavement of the streets, and because that is very strong we do not care
very much how much weight there is - the street will hold it! Also we
do not need to care about going up or down - the street does it for us
by it's construction!
- For an aircraft that works only while on ground - what we
are not interested in now. In the air we have to produce that
counterforce by the so called lift, that is produced based on the
surrounding == Air. And that lift must change depending on going up or
down or cruising leveled! That is the big freedom we have in an
aircrafts: We do not (have to) follow the predefined ways! We are free
to move into all 3 dimensions - while in a car we are restricted to only 2
dimensions!
- Air-Drag
|| Thrust: These
forces are much more comparable, except that there is one more drawback
for the car, called "rolling friction". Otherwise you could move a car
by propellers - and would find everything pretty much the same,
independent of car or aircraft!
|
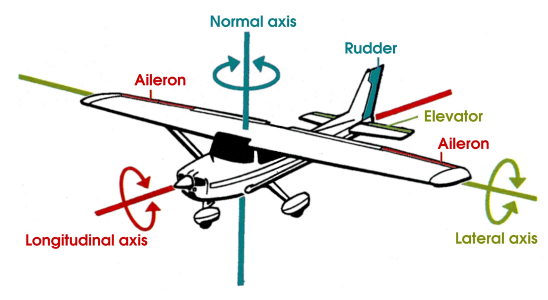
Freedom of Movement
|
Let us see how we move in an
3dimensional world, i.e. around 3 axis:
- Normal
axis (also called "Top axis"): This is the only axis we also know from cars: It is just
turning left/right.
All other movements are enforced onto a car by the terrain! That is a
so to say "2 times more freedom for pilots"! The only problem: The
pilots also have to (learn and then
do) balance three interacting forces - a real juggling!
- Longitudinal
axis: Tilting
a car sideways is usually not wanted - mostly it is called a "bad
accident"! While flying we need that all the time - very intentionally
and very controlled.
- Lateral
axis: Also this up/down
is not really advisable for a car - unless you want to jump e.g. from
a bridge into a river - and that would be a "very uncontrolled flying".
In a car we better let us "force by terrain"! Of course you could do
the
same with an aircraft: Just keep the gear down and fly low! The next
hill will force you
upward like a car - but the "Public Health Authority" believes that to
be very un-healthy"!
|
Did you notice that I talked about the 3 axis, without relation to the
controls - although the sketch proposes such a relationship? That I
did very intentionally, because that relation deems obviously - but
does not really exist! See the following:
Lift
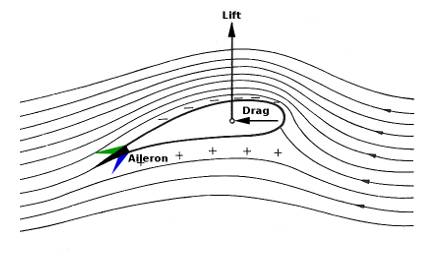 In the
forgoing we learned already,
that we need a force called "Lift" to keep us in the air when the
"Weight" pulls us down. We produce that "lift" by pulling the wings
through the air and giving them a special form. Have a look at that
picture:
The wing is formed so, that the air going over the top of the
wing has a longer way to go compared to going underneath. But of
curse somewhere before and after the wing the air will be reunited. So
each tiny
piece of air that is going the longer way needs to speed up and stretch
over the longer distance. And stretching an equal amount of (air-)
pieces over a longer distance means those pieces are less dense to each
other. In the total context that means that the air-density above the
wing is
considerable lower. In other words: There builds up some kind of a
vacuum above
the wing
- which pulls the wing upward (like if you suck something with your
mouth, or whatever)! In the
forgoing we learned already,
that we need a force called "Lift" to keep us in the air when the
"Weight" pulls us down. We produce that "lift" by pulling the wings
through the air and giving them a special form. Have a look at that
picture:
The wing is formed so, that the air going over the top of the
wing has a longer way to go compared to going underneath. But of
curse somewhere before and after the wing the air will be reunited. So
each tiny
piece of air that is going the longer way needs to speed up and stretch
over the longer distance. And stretching an equal amount of (air-)
pieces over a longer distance means those pieces are less dense to each
other. In the total context that means that the air-density above the
wing is
considerable lower. In other words: There builds up some kind of a
vacuum above
the wing
- which pulls the wing upward (like if you suck something with your
mouth, or whatever)!
Surprised? Yes me too (some time ago). And yes: There is something
added to this by the air pushing the wing up because of the angle of
the wing to the air - but that is just about 25% of the Lift, and
varies with the so called AoA (Angle of Attack).
That picture also explains the stall: Imagine you increase the AoA towards 90°, then certainly there will come a point where the air above
the
wing does not follow the wing-surface any more but just tears off, thus
you loose at least 75% of your lift --> and the winner is: "the
Weight!". And your job will be getting the air back onto the surface
and then pull up again very gentle, so that it does not tear up again!!
(See "Stall and Spin")
Also notice that the aileron (blue) will even lengthen the way that
upper air has to take, while the green one does the reverse!
For more details see: http://en.wikipedia.org/wiki/Flight
And notice that propeller-blades actually are the same as a wings (just
have a close
look onto the form!) - and they act accordingly. Thus "Lift" and
"Thrust" are produced the same way. The only difference is:
- "Lift" is
produced by pulling the wings through the air by "Thrust"
- while "Thrust" is
produced by the propellers being moved/rotated through the air by the
engine.
|
|
Dependencies
Now
let us have a look what happens when we use this freedom of moving in
all 3 Dimensions, i.e. around the
three axis. And let us analyze this by doing a turn:
 As we did
already during the "Solo-Flight"
we will start the turn by using the ailerons,
that means we tilt
along the Longitudinal
axis.
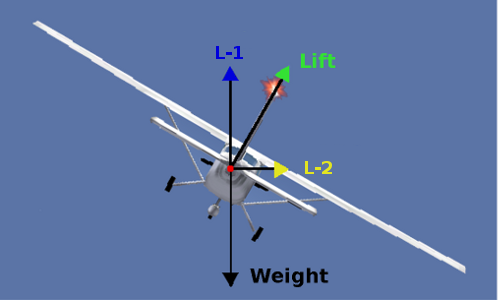
So we get the picture on the left. What you should see is that the
"Weight" (== gravity) remains the same - and also the "Lift" remains
the same size. But because it is acting 90° upward to the wings,
it now is not the direct opposite of the "Weight" - actually now only
the part "L-1" works against the "Weight", while the other part ("L-2")
pulls us into the turn. As we did
already during the "Solo-Flight"
we will start the turn by using the ailerons,
that means we tilt
along the Longitudinal
axis.
So we get the picture on the left. What you should see is that the
"Weight" (== gravity) remains the same - and also the "Lift" remains
the same size. But because it is acting 90° upward to the wings,
it now is not the direct opposite of the "Weight" - actually now only
the part "L-1" works against the "Weight", while the other part ("L-2")
pulls us into the turn.
Obviously "L-1" is not strong enough to equalize the "Weight", so we
have to increase the Lift. We do that by pulling the elevator
(=Lateral
axis) and thus raising
the nose and thus changing the "Angel of Attack" -- actually we
do initiate a climb (as usual! But
hopefully that "climb" does not change our altitude!).
Now
we are circling - and thus we get into a new problem! May be you
know that from kids-playing or from "Holiday On Ice" or just try it
with a couple of friends: Grab your hands side by side and start
turning
in circles. You will see pretty soon that the innermost guy is just
about standing still (just rotating) while the outermost one runs like
hell! Look to the picture and compare the right most
wink-tip with the inner guy and the left wing-tip with the outer guy.
You got it? The outer wing (left) is altogether moving faster through
the air then the inner wing (right)!
- As a nice side-effect that does add to the tilt
produced by the ailerons
- = faster wing through the air produces more lift on that
side --> raises that wing --> and thus supports the ailerons (may
be even that strong that you have to use the ailerons into the opposite
direction! It's magical: At that point you steer the ailerons
to the left - while wanting to turn to the right!)
- = faster wing through the air also produces more drag -->
that
means the outer wing "hits the break" and thus tries to turn us to the left!
So what do we do against that? Yes: We need to work against that by
using rudder
and thus we need also a turn around the Normal
axis!
Now you know why a pilot could easily earn his money in a circus,
juggling
different things at once!
And you should know now why I had problems to define which
control-unit to be used for what:
You always need to
adjust all 3 controls just to move around one axis !!!
If you did not really noticed that yet - remember: You
still might have the option "--enable-auto-coordination"
active! As a good pilot you will not always fly with that help, because
it prevents you from performing special procedures for different
situations, e.g. Slips, Cross-Wind-Landings, etc. Let us prove what
we said so far:
Do one more solo
- but this time without the option "--enable-auto-coordination"
- and when in level flight try to apply only 1 of the controls
- and watch what all 3 axis do!!
In the chapter Turns we will extend our knowledge
about that even more!
|
The "Flaps“
Already during your first flights you used the flaps - now we should
get a better understanding about the "why":
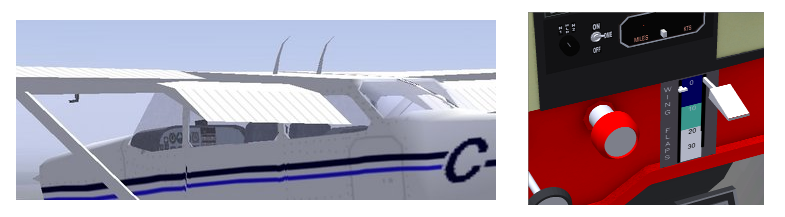
In the left picture you see the Flaps fully lowered. In the right
picture you see the lever that operates the flaps and the little
indicator to the left of it indicating the actual setting, inclusive
the transient movement (sorry: Both
pictures do not show the same situation!). But there are no
hotspots to operate the Flaps by mouse - use the keys "]" to set and "[" to retract.
To check the flaps position visually, either use the mouse view mode to
look at the back of the wing, or type "Shift ←“ (to look left) or "Shift →“ (to look
right) and then quickly "Shift
↑" to get back to the front
view.
- Flaps increase the wing lift by altering the shape of the airfoil (compare above chapter "Lift") - but also increase the "Drag"!
- So using the flaps helps you during TakeOff and Landings, because
- You may fly considerable slower, because of the increase in "Lift"
- You will fly considerable slower with the same power-settings, because of the additional "Drag"
- You will have a much better view to the ground, because you fly with a lower "nose-attitude"
- But apply them gradually, because
- applying too much flaps at high speeds may tear off the Flaps
- applying "full flaps" at once when already near stall-speed
may reduce the speed that fast, that you stall before you can increase power
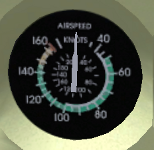 So watch out: The
flaps are somewhat delicate: See the white ring inside the "Airspeed
Indicator"! So watch out: The
flaps are somewhat delicate: See the white ring inside the "Airspeed
Indicator"!
- do not deploy the first step of flaps above 100 knots. (Or
they may disassemble and fly away!)
- do not deploy the second or third stage of flaps above 85
knots.
The flaps create a large amount of drag on the aircraft and brake the
plane at high speed. This is one more reason not to forget to retract
the
flaps as soon as you fly above 85 or 100 knots.
|
The Normal usage of the Flaps:
- 0° - for normal flight and normal take off.
- 10° - for short field take off, when you want to gain altitude
while flying slowly. Or during the first stage of an approach to land.
- 20° - to slow the aircraft and lose altitude quickly, for example
when descending towards the runway to land.
- 30° - to slow down even more quickly.
The fact that the flaps brake during landings makes you need more engine
power during the landing. This may seem odd! Why not simply throttle
the engine down to minimum and use less flaps? The answer is that
it is better to have a strongly braking plane and lots of engine power,
as the plane reacts faster to your commands. Should the engine fail on
short final, you can just retract the flaps as needed and glide to the
runway.
What can you do if you have full flaps extended and need to increase
your rate of descent further? Slowly push the rudder pedals on one
side. This will make the plane present its flank to the air stream and
brake. Compensate the turning by using the ailerons (yoke). This is
known as side-slipping, and is a very effective way to lose height
progressively, as it is easy to stop at any point. (Of course that is not possible to do with
the option "--enable-auto-coordination" active!)
"Stall“ and "Spin“
As
we learned above an aircraft relies on the smooth flow of air over the
surface of the wing to produce lift. However, if the wing is at too
high an AoA
, this flow is broken,
and the wing no-longer produces lift. With no lift, the aircraft cannot
fly, and quickly drops back to earth. This is known as a stall. This
stall can happen at 2 very different occasion:
- The
High-Speed Stall: Looking at the picture "Lift"
you surely can imagine that, if in a worst case the wing would be close
to vertical to the airstream, then the air would not have any chance
to follow the surface of the wing. The airstream would break off
the wing and in between the surface of the wing and that broken
airstream would be created many many vortexes, which cannot carry
anything! That is pretty much the situation if e.g. you do
a "power dive" and then try to pull up with all your strength. Then it
is no problem at all to produce such a stall - in a Jet - but with our
beloved, sweet-tempered Cessna that takes a lot of hard work to produce
such a "High-Speed-Stall" - you might not be able to do it at all!
- The
Low-Speed Stall: This
is physically the same as the High-Speed one, but you need no force at
all to produce it! You just need to get that slow, that the produced
"Lift" (remember: Airstream-speed
over
wing-surface is lift!) is reduced that much, that it cannot
hold the
plane
in the air any more! The aircraft will start falling down
vertically -
and
that means we have the same as in 1, just at a much slower speed! And
remember: A "Stall" is an ideal landing -- but only if it occurs just 1
inch above ground - not some hundred yards above it! This close
relation between stalling and a "perfect landing" is the most critical area for stalls!
It would be nice, if after a "Stall" happened you could just push the
nose down a little, to gain
some more speed and everything would be fine -- but it is not!
Remember: We said above that not just the airstream broke off from the
surface, but also there are created many many many many vortexes, which
all together do everything to obstruct the reunion of airstream and
wing! So you need to recover:
- first FORCE
a much higher speed to first blow the vortexes away
- i.e.: full engine power and dipping the nose very drastically -
there is no time for petting!
- thus enabling the reunion of airstream and the wings
- and then you have to pull up GENTLY
- do not overdo it now: You
are very close to produce a "High Speed" stall now!
- (Do I have to mention, that
all that costs a lot of altitude??).
Did you notice that we still can use the Elevator to steer down? Thanks
heaven! Actually that is one of the most critical tasks during the
aircraft
development: Making sure that the elevator
"stalls" much later! But do not wait too long to react!
Surely you are beating me now with: "You stupid - during a final I
do not have enough altitude and time etc. - that is absolute
nonsense!".
And you are right - it is! It is as stupid as jumping from a
Skyscraper without a parachute! But for your support there are 4 early warnings within your
aircraft:
- Aircrafts are equipped with stall sirens that sound when the
critical angle of attack is approached (of course you might not hear it if you
chose the FlightGear-option "--disable-sound" or turned down
the volume!). In reality You
have no (legal) possibility to switch that alarm off!
- Before a Stall you will notice that the steering-controls start
acting delayed and
somehow give a "soft" feeling (of
course not with Autopilot active!)
- Know your Stall-Speed and watch the airspeed!
- Actually a Stall is not really critical if you are high enough
and know what you are doing --> Thus you can always test what your
Stall-Speed is and watch for it!
To find your Stall-Speed:
- level your aircraft at a safe altitude (let us say 2000 ft above
ground)
- trim for a level flight
- now slowly start reducing the RPM and keep the altitude by
pulling the elevator (do NOT trim!)
- increasing that wait for the siren to sound (You switched
the sound on, did you?)
- continue to reduce speed while
holding the altitude
- note the airspeed when stalling
- then nose down rapidly and full power
- after reaching some normal speed pull up gently
The "Stall Speed" for our C172p should be at about 50 kn without Flaps
and 45 kn with Flaps, so I would start pulling up again at about 70 to 80 kn!
You should try that several times, with flaps and without -- and I hope
you agree:
You must know the
Stall-Speed for every aircraft you are flying prior landing it!
And be aware: The faster an aircraft can fly -- the worse its stall characteristics are (usually)!
The Spin occurs
when one wing stalls before the other. Remember: In turns the inner wing moves slower - and that
means: In a turning movement it will "stall" first! And while one wing is still flying, the aircraft turns around
the stalled wing, spinning tighter and tighter. To get out of a spin,
you need to kick the rudder very strong against the turning direction,
in order to convert the
spin into a normal
stall, then recover as above. Again you have to apply the rudder fast
and energetic - but then watch out not to overdo it: It is easy to get
into another Spin - just to the other side!
But again: In enough altitude it is no problem at all to practice - it
even is a MUST in a real flight-school prior to your first "SOLO".
So do the same as above for exercising the stall - but just before it
really
stalls hit the rudder to the side you want.
And now: Have a "Merry-go-Around" practicing it!
But as said before: You must avoid significant turns on short final
- because if you do that when already close to "Stall-Speed", then you
will definitely go into a spin - which at that altitude you cannot
recover from!
If you want to know more about Stalls see e.g.:
http://en.wikipedia.org/wiki/Stall_%28flight%29
Standard Procedures
The following procedures are based on
the C172p. But the principles are the same for all aircraft - even if
some technicalities do differ depending of the model: Prop, Jet,
Amphibian, Zeppelin, Helicopter, etc. Also they may differ based on
what the designer of that model intended: Did he design for a "most
realistic model with all auxiliary functions" or did he concentrate on
"easiest to fly".
Engine
Control
An airplane engine is designed for simplicity,
reliability and efficiency. You are probably aware that the fuel inside
a car engine is ignited by
electric sparks, produced by advanced electronic ignition and fuel
injection systems. If that system fails, there is no real hazard: You
pull to the side and call a mechanic. But if that happens in an
aircraft during flight that will be a real thread for death -- for
both: The human (you) and his beloved aircraft! So the aircraft system
does not really on those complex systems but they use older
technologies
that do not rely on electrical power: The good, old-fashioned, but most
reliable magneto
ignition.
That way, the plane can still fly even if it suffers complete
electrical failure. For redundancy, it even contains two magneto systems:
the
“left” one and the “right” one. Should one of the two magnetos fail in
flight, the other one will keep
the engine running. The failure of one magneto is rare - the failure of
both simultaneously is almost unheard of.
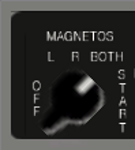
You find the controls for the engine and magnetos on the bottom left of
the instrument panel:
|
For the C172p-model there are
two types available.
- The modern style "Ignition Key" like in a car - used in the
3D-models.
- The old style "Ignition Switch" - still used in the
2D-panels.
To switch between those two types use "P" or "menu → view → Display
Options → Show 2D panel":
In the
3D-Panel you can zoom in/out by using "x"/"X" or by the
mouse-wheel in "View-mode" (after
you clicked the right mouse-button twice!). "Ctrl-x" will
reset the view to the original.
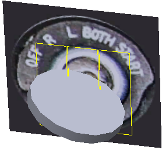
You move the key/switch by typing "{" and "}"
or click into the hotspots. For the upper 3D-version you use the third
hotspot to start the engine. When you change the magneto switch to "OFF", both
magnetos are switched off and the engine will not run. With the magneto
switch on "L"
you are using only the left magneto - on "R" you are using
only the right magneto. On BOTH you use both. In normal flight you
must use BOTH.
If you turn the switch to OFF, the engine noise stops. If you quickly
turn the switch back to L, the engine starts again as the propeller is
still turning. If you wait for the propeller to stop, placing the
switch on L, R or BOTH won’t start the engine. (Once the engine is
halted, always place the magneto switch to OFF.)
|
Starting the Engine
The Cessna allows you to start the engines the "realistic" way - and/or
take an "unrealistic shortcut". Let us see both:
(If you cannot see the
"Ignition-Switch" in the lower left part of the instrument-panel,
remove the yoke: "Menü
→
Cessna C172P → Show/hide
yoke“).
- To start the
simulated / realistic way:
- Make sure Your engine is Off! If it is not
see the following "Switching Off the Engine"
- Switch the Fuel-Selector-Valve to "Both" (In the latest C172p release that switch
is below the
Trim-Wheel on the center pedestal!)
- Check the Ignition-Switch: It should be turned off as
shown (otherwise turn it off with
multiple "{"
or mouse-clicks into the left
hotspot)
- Clicking three times into the center-hotspot (or "}") brings the key into the "BOTH" position.
- Click into the right-hotspot (or "s" in 3D or
another "}"
in 2D) to "Start".
The
engine will start rotating - wait a little until it rotates freely -
then release the button/key.
- The RPM should settle at ~500 RPM and the Gyro-Horizon
will turn into a reasonable position
- As a good Pilot (to be) you now must test that
both Magnetos
function properly:
- Push the Throttle in until the RPM indicates about 15 (=1500
RPM)
- Switch the Magnetos to"L" ("{"
or left hotspot)
and watch the RPM: There should be a noticeable dip - but if the engine
shuts down completely you have to call the mechanic before starting
- If the "L" tests OK do the same with the "R" (one more "{" or left hotspot). Again: Only if
that works out OK you may continue.
- Switch back to "BOTH" (multiple "}" or right hotspots) - the RPM
should rise again to where it was before
- At last insert the Yoke again if removed (of course you could fly (in the
Simulator) without the Yoke - but somehow that looks odd!)
- In case you have multiple Engines you need do this same
procedure as above for each engine, after selecting it: Key
- "!“ to
select only engine No. 1
- "@“ to select only
engine No. 2
- "#“ to select
only engine No. 3
- "$“ to select
only engine No. 4
You could also switch multiples by
typing e.g.: "!$" would select 1 and 4
- "~“
to switch all engines again to the normal control, i.e. they react
again common to all commands!
- To
start the "Quick and Dirty", unrealistic way
I admit: That is shocking easy and you
probably will not use the "realistic way" very often - at least not as
a newbie! And if
you never want to become a true "
Simmer"
thank the designers for making it that easy - and do not talk about it
any more!
Anyhow: That lengthy procedure is a nice
demo of what you might expect if in future you
will fly nicely modeled, complex aircrafts. Those require lots of more
actions prior to start! In some cases it may take you several
minutes
to go through the required procedures! But
even in those complex models you may have a look in the menu-bar: Often
you will find an extra entry with the name of that model - and in that
there might be an extra routine to start up with one keystroke!)
Switching
Off the
Engine:
As a true "Simmer" you
will
of course not just exit FlightGear or
even just switch of the PC -- You will of course be kind to your aircraft
and:
- For an orderly shutdown you first pull the throttle
out completely, to get the engine to minimum power
and fuel consumption.
- Then pull
the mixture lever, till the engine
stops because the mixture contains too much air. This ensures the
engine does not get choked by waste fuel residue.
- Finally, turn the
magneto switch to OFF to ensure the engine won’t start again
accidentally.
Throttle
 You already
know that you increase the engine power by pushing that throttle in -
and reverse: You already
know that you increase the engine power by pushing that throttle in -
and reverse:
- To push in use the Page Up key", to
pull out use Page
Down
- You can also use the mouse:
- For
the 3D just move the cursor over the Throttle and rotate the mouse-wheel.
- For
the 2D model click into the hotspots, with the left mouse-button
or the mouse-wheel (here: Click, not rotate!)
|
But what does “increase the power” actually mean? Does it mean you
increase the amount of fuel delivered to the engine? Yes, but this is
not enough to fully understand what you are doing. You need to be aware
that the engine is also fed with a huge amount of air. The engine’s
cylinders burn a mixture of fuel and air. Fuel alone would not burn -
neither would the air alone!
Only a mixture of fuel and air can detonate and move the engine
pistons. So when you push the throttle in, you increase both: The fuel
and the air fed to the engine
Mixture
 Operate the Mixture-lever as you did with
the Throttle - except when using the keys use "m"/"M"!
Operate the Mixture-lever as you did with
the Throttle - except when using the keys use "m"/"M"!
The amount of air compared to the amount of fuel is critical. The
proportion of the two has to be tuned closely. This is the purpose of
the mixture lever. The picture shown displays the mixture lever, pulled
out far too much (for a startup!).
When the mixture lever is fully pushed in, you feed the engine with
lots of fuel and little air. This is known as a “rich” mixture.
When the lever is pulled out completely, there is an excess of air,
known as a “lean”
mixture. The correct position to produce maximum power is in between
these two extremes, usually quite close to fully pushed in.
When you start
the engine and when you take off,
you need a "rich" mixture. That means the mixture lever should be
pushed in. A "rich" mixture allows the engine to start easily. It
also makes the engine a little more reliable. The drawback is that a
part of the fuel is not burned inside the engine. It is simply wasted
and pushed out the exhaust. This makes the engine more polluting, it
decreases the energy the engine can deliver, and it slowly degrades the
engine by causing deposits of residues inside the cylinders.
Once in normal
flight,
you have to pull the mixture lever a little, to get a more optimal
mixture. Check this out by doing the following. Start the simulator.
Put the parking brakes on with "B" (that is
Shift-b). Push the
throttle in to its maximum. The engine RPM should now be close to the
maximum. Slowly pull
on the mixture lever. You will see the RPM increases a little. You get
more power, without increasing the fuel intake. You waste no fuel and
it pollutes less. If you continue to pull the mixture lever, the RPM
will decrease back away, because now there is too much air. The excess
of air slows the explosions down inside the cylinders and decreases the
explosion temperature, hence the thermodynamic yield decreases. You
have to tune in the optimal mixture. For thermodynamic reasons, the
best mixture is not exactly at maximum power - it is better for the
engine to be running very slight richer or leaner than maximum power.
This also avoids the possibility of the fuel detonating explosively -
that could damage the engine. You can find the maximum power point by
the
fact
that there you get the highest RPM. (Another method is to check the
engine exhaust
temperature. Roughly, this is the point at which you get the highest
temperature.)
Thus the mixture control allows you to burn less fuel for the same
speed and
distance, and therefore let you fly farther and pollute less. However,
if you mis-manage it, it can cause serious problems! e.g.: At high
altitudes there is less oxygen available - so the correct mixture will
be lean (less oxygen requires less fuel for the ideal mix) - thus you pull out the
lever more and more while climbing. If you then descent
and forget to push the mixture lever in, the fuel/air
mixture will become far too lean and the engine will simply halt.The "instable" RPM
An important warning:
you may think the RPM indicator reflects the
engine power. Wrong! Two things make the RPM increase: the engine power
and the airplane speed. To check this, fly to a given altitude then
pull the engine power to minimum. Try out diving to the ground then
rising back to altitude. You will see the RPM varies significantly as does your airspeed. It rises while
diving and decreases while climbing. That is the same effect on a car:
Going downhill will increase the RPM (and speed) - uphill it will
decrease the RPM (and speed). That is because the motor power setting
remains the same - while the needed power varies!
One pitfall of this occurs when you intend to tune the engine power in for
landing. Suppose you’re descending towards the airport, flying fast.
You know the ideal RPM for landing is around 1,900 RPM. So you pull the throttle till you
get 1,900 RPM. After some delay you get to the low flight speed you wanted - but may not notice that the RPM
dropped significantly. You will either lose altitude or stall. Or both.
So be cautious with the throttle and with the RPM indicator: Either pull
on the throttle more steadily or be mentally prepared to push it back
in quickly.
Starting
Also in the Simulator you should stick to some rules and standard
checks to avoid problems:
- Before Taxiing:
- Set the altimeter to the altitude of the airport (e.g. KOAK=9
ft, KSFO=13 ft, EDDF=364 ft, etc.)
- Compare the "Gyro Heading Indicator" with the "Magnetic Compass"
- Check "Elevator Trim" on "Take Off" (See the mark to the left
of the Trim-Wheel below the instrument-panel)
- Switch the Fuel-Selector-Valve to "Both" (In the latest C172p release it is located below the
Trim-Wheel on the center pedestal!)
- "Cleared to
TakeOff"
- Mixture
is full rich (red lever full in)
- Fuel
on both ?
- Altimeter
on Airport altitude?
- Heading
Indicator same as Magnetic Compass ?
- Trim
on TakeOff ?
- Flaps
in ? (max. 10° for short field take offs)
- Landing
Light on !!
After TakeOff You should climb at a steady speed of around 75 knots. But when you raise
the nose slightly at 40 knots, the aircraft will probably TakeOff and start climbing at
around 55 knots! To accelerate quickly to 75 knots, lower the nose
slightly immediately after take-off - and raise it again once 75 knots has been
achieved. Thus you are using the yoke to control the speed of the aircraft.
Putting this all together with what you have learned previously, a
normal take-off will consist of the following:
- Release the Parking
Break
- (If you use the mouse to
control: Mouse mode "↔", keep the left mouse-button pressed to steer with the
Front-Wheel!)
- Full
Throttle (PgUp▲)
- Hold the center of the runway by small movements with the mouse, while keeping the left mouse-button pressed
- At 45 kn
start pulling the Elevator "softly!" to lift the
nose-wheel at 55 kn
- At 55 kn
take off with a very shallow climb
- Primary
goal is now to gain speed (You are still in hazardous conditions due to
possible "gusting winds", "Engine Failures", and similar)
- Perform only very shallow heading corrections
- Release the left mouse-button - you now control mainly with
the ailerons
- After 70 kn
hold the speed by varying the AoA
between 70- 80 kn
- Keep the Throttle on Maximum
- Hold the
direction of the runway
- on controlled airports until advised different (by ATC)
- on uncontrolled airports
- at least till 500 ft above ground
- prior to flying over houses you must have a minimum
altitude of 1000 ft above ground
- Climb
to your cruising altitude and level off
- Set your RPM
as wanted (inside the green area!)
- Take your time to Trim to best can do
Holding Direction
Knowing the direction you are going is obviously a good idea.
There are four basic ways to determine the direction you are flying.
Let us have a closer look to those techniques:
- By looking through the windows:
As we have noticed during our
first Solo the easiest type of navigation is
to use visual landmarks, e.g.:
- following dominant coastlines or rivers or highways or railroads
etc.
- aim towards dominant landmarks like Valleys or Mountains or big
buildings or a forest or towers etc.
- or look for a unique combination of both, like e.g. "highway
crosses river" etc.
At your Homebase you certainly will
discover lots of those "personal landmarks" to use. But also for long
cross-countries into unknown areas you should be able to
find "landmarks to look for" on street-maps, Atlas, MPmap, Google, etc.
And even if those are not exactly shown in FlightGear as on photos or what ever - you
will spot them easily.
Sorry that in a simulator, we can only offer you a narrow view of
the virtual outside world. Several ways exist to allow you to pan your
virtual head
inside the airplane (if you do not want to set up several scenarios
around you, see e.g. "
Using
Multiple Screens"):
- use Shift
and the four arrow keys "←↑→↓“ to look to
the front, rear, left and right.
- use Shift and the keypad keys to look into the four directions
mentioned above and in four diagonal directions in-between.
- use the mouse in view mode (right button, ↔). This allows you to
look in every direction, including up and down. Click the left mouse
button to bring the view back to straight ahead.
- and do no forget the wonderful possibility to just jump outside
and have a look around. "v/V" and the mouse or key techniques!
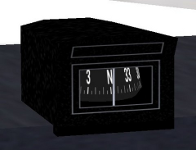
- By Magnetic Compass:
This
is located above the instrument panel. The compass is simple, but reliable (as discussed for the Magnetos). Sorry enough it
is affected by the acceleration of the aircraft, and magnetic
abnormalities as well from the construction of the aircraft as well
from the geography. Also, the compass points towards magnetic
north rather than true north. This deviation varies depending on your
location.
To learn more about it see e.g.:
http://en.wikipedia.org/wiki/Compass
- By Directional Gyro:
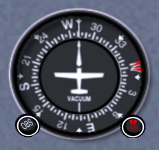 The
gyro is powered by a vacuum system. The gyro is set to match the
magnetic compass, and is not affected by magnetic issues, or aircraft
movement. However, due to gyroscopic precession and friction in the
instrument, over time it drifts and must be reset by reference to the
magnetic compass on occasion. To reset the Gyro during cruise flight,
use the black knob on the bottom left of the instrument (normal mouse
pointer mode, click left or right of the knob, or use the middle mouse button
to move faster, Ctrl-c to activate the hotspots). The red knob, bottom
right, is used to tell the autopilot what direction you wish to fly
(HDG = “heading”). The
gyro is powered by a vacuum system. The gyro is set to match the
magnetic compass, and is not affected by magnetic issues, or aircraft
movement. However, due to gyroscopic precession and friction in the
instrument, over time it drifts and must be reset by reference to the
magnetic compass on occasion. To reset the Gyro during cruise flight,
use the black knob on the bottom left of the instrument (normal mouse
pointer mode, click left or right of the knob, or use the middle mouse button
to move faster, Ctrl-c to activate the hotspots). The red knob, bottom
right, is used to tell the autopilot what direction you wish to fly
(HDG = “heading”).
|
- By Radio-Navigation:
In chapter "
IFR
Cross Country"
we will learn how to use the Radios for "RNAV = Radio-Navigation". But
as with Autopilots: You should first learn how to navigate
without
"Automatic Helpers" - so you can continue even if the "Automatics" fail
to serve you! You should be, and remain being the
(responsible) BOSS!
Trimming
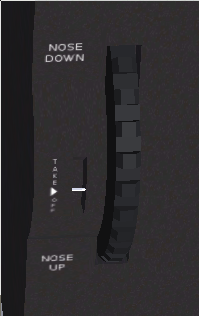 The trim is the
dark big vertical wheel with gray dots located at the middle below the
instrument panel(.
The trim is the
dark big vertical wheel with gray dots located at the middle below the
instrument panel(.
On FlightGear, the keys "Home" and "End" adjust the trim. Home rolls the
wheel upwards while the End rolls the wheel downwards. You can also
click on the upper or lower half of the trim wheel, or roll it with the
mouse-wheel when the mouse is positioned over it.
In first approximation, the trim does the same as the yoke: it acts on
the elevator. Turning the trim wheel downwards is the same as pulling
on the yoke. Yet there is a key difference between the trim and the
yoke. The trim remains in position after you make a change, while the
yoke only continues to affect the elevator while you apply pressure and
returns the elevator to neutral when you release it.
During cruise flight, the required elevator position to keep the
aircraft at constant altitude will not be completely neutral - it will
vary depending on the air outside the aircraft, the current fuel level,
and the payload. Obviously, holding the yoke continually to retain a
constant attitude would quickly become tiring. By using the trim to
“trim out” the elevator, the yoke can
be kept neutral.
During take off the trim should be neutral. Otherwise you may find that
the aircraft either refuses to take-off with the normal level of yoke
control, or
takes off too quickly -- and thus you crash before knowing what is
going on!
During landing, try to keep the yoke/mouse/elevator in neutral
position - instead use the trim.
The resulting flight-attitudes, due to the trim wheel movements, will
be noticeable much slower than than those by the yoke! So be patient!
If you cannot trim "well enough" try to support the Trim Wheel adjustments by
"MICRO"-adjustments with the Throttle! Then be even more patient!
Turns
In
the forgoing, and especially in the chapter "Dependencies", we learned,
that, when we use some "help for beginners", we cannot perform all flight-maneuvers we need later on!
So "--disable-auto-coordination“ and thus manipulate rudder and ailerons as unique controls!
So let us start (without "--enable-auto-coordination“)
and level off on 2000 ft and trim the aircraft. Then check the, for
the turn, most important instruments:

"Attitude Indicator"
(the blue/brown instrument): Adjust the little
aircraft symbol inside it, so that
the wings and the center-point of it are in one line with the
"horizontal
line", i.e. the line between brown/blue.
"Heading Indicator"
(just below it):
Set the "red bug" within the scale to the
heading we are now flying. We will turn until that "red bug" gets back
to
that position again - i.e. after a full circle of 360°
"Turn & Bank Indicator" (to
the left of that).
That one will show us during the turn the "Turning Speed" and with the
little ball in the "water leveler" how well we coordinate all three
controls needed (aileron, rudder, elevator: compare "Dependencies")!
With these settings we are flying a "standard turn"
that will always turn us 360° in 2 Min., independent of speed and type
of aircraft! And that is the specification for any turn required in any
procedures - see e..g. also in the following "Procedure Turn".
We exercised and proved that already in the part "First Solo" under "Turns".
|
Let us try to achieve the attitude as shown in the picture above -
and hold it for a full circle:
- Use the Ailerons to start the turn to the left:
- Turn the Yoke left and watch the "Turn-Indicator", let the
needle go and stay on the first scale mark left (Yes: In the picture it has gone too far!)
- Use the Rudder to center the ball in the lower part of the "Turn-Indicator"
- In the "Attitude Indicator" you should see that the Center-Dot
moved below the horizon (indicating a descent!), so gently pull the Elevator to keep that Dot
on the horizon
- Keep that attitude:
- "Attitude Indicator": Center-Dot on the horizon
- "Turn Indicator": on first mark and ball centered
- "Altimeter" and "Vertical speed" stay unchanged
- About 10° prior reaching the red bug in the "Heading Indicator" again,
return to level flight:
- level the wings with the horizon
- while the bank reduces, apply less and less Rudder and Elevator
- Establish again a leveled and trimmed flight at 2000 ft, as
we had at the beginning.
Then do the same exercise to the right and then to the left again and
the right ... etc. ect.
And as soon as possible return to our old rule:
Fly by
the horizon and use the instruments to verify the achievements over
time!
Try this several times until you can exercise these coordinated turns
from the
beginning to the end - i.e. the ball in the "Turn & Bank" stays
centered.
(Do not get frenetic: I do not know
many pilots who can do that perfectly! - Except the Autopilot! And that
one we definitely do not want to use (for now!)).
Procedure-Turns
When you can perform that basic turns, let us try something
sensible: When you fly controlled you will often be
asked by ATC to perform a "Procedure-Turn"! See the following picture
for what
that is:
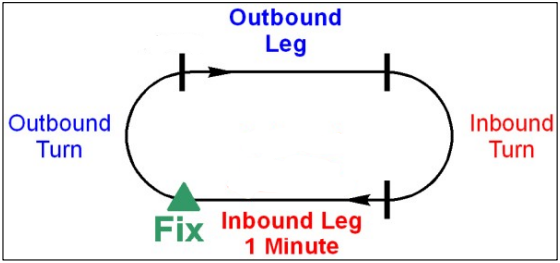 |
- Look for a dominant "Fix" in the landscape and fly towards
it
- Set the red "Heading-Bug" to the current heading (all the
way upward!)
- Get your Stopwatch
- in FGFS ver.1.9.: Menu → Debug → Stopwatch
- in FGFS ver.2.0.: Menu → Equipment → Stopwatch
- Over "Fix" start your turn to the right as described above
- until the "Heading-Bug" is vertically down (i.e. turned 180°)
- Start the Stopwatch and fly straight for 1 minute
- Then do another 180° turn (the red bug is vertically upward
again)
- Then again straight for 1 minute
- etc.etc. - until ATC
calls you out of the "Procedure".
|
If there was no wind you are back over the "Fix" all 4 Minutes (2*1minute for the inbound/outbound legs, 2*1
minute for the standard 180° turns).
===> This one you
really should try more often - because you will need it when flying in
busy areas!
Watch especially your altitude: There may be many aircraft in the
Procedure-Turn, vertically separated by just 1000 ft!
When you later on fly controlled (by ATC)
you mostly will not use a landmark for the FIX, but a RNAV (Radio-NAVigation) (VOR, NDB,
etc.). Thus you can always return exactly to the FIX by adjusting
the "Inbound Leg" as needed. See in the following a " realty"
Approach-Procedure to EDDF:
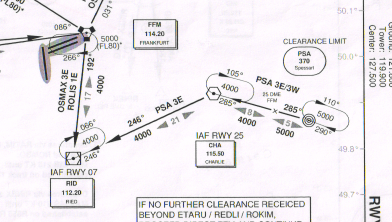
In the map you see three "Procedural Turns" at the VOR's "FFM", "RID", and "CHA" - and one over the NDB PSA.
Let us analyze the procedure over "CHA":
We approach that normally with a heading of 285° (set the "red bug"
accordingly!) and a minimum altitude of 4000 ft. But when busy ATC might advise you to start at a
higher altitude. Then, later on, he will advise you to lowered down as other aircrafts
below you
leave the Procedure-Turn!
By the way: The official times
for the Outbound/Inbound Leg are 2 minutes (in the exercise I
reduced it just for those exercises - in order that you may exercise it
a little longer/more often!).
|
Approach
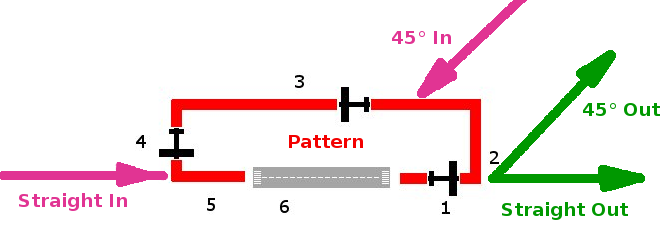
There are 3 possible procedures for an approach:
- "Traffic
Pattern“:
This is the safest, easiest and most commonly used procedure for GA. With this procedure you can inspect
the airport before you land
and you have common waypoints for when to be at what altitude with what
speed. You approach the airport from outside on the altitude of a
standard patter (800-1000 ft AGL)
and join into the "Downwind" at an angle of 45°. See
- "Straight
In“: This
procedure is only advisable if you already know the airport and some
waypoints - and at controlled airports this approach is (worldwide!)
allowed only if explicitly approved by ATC! With this procedure it is really difficult to
define what altitude and speed and flaps you should use when!
Especially if that airport does not have a DME! You can train for such an
approach when doing it at an airport that is equipped with ILS - you then can follow the ILS
indicators while flying manually! (Or you use the "Menu → View → Toggle Glide Slope Tunnel" -- but that again would be something a real simmer would never do, because it is absolutely unrealistic!)
- "ILS“
(Instrument Landing System):
For this one you use the Radio-Navigation and approach the runway on a
"localizer" (a radial sent by the ILS). All in all this is the same as
"Straight In" - but supported by RNAV.
The "Traffic Pattern“
The
following applies to an airport being located in a plain area! If there
are hills or mountains or other objects in the area you have to adapt
this procedure (may be a higher patter, left/right pattern, etc.).
Before you
enter the pattern (45° In)
you should have set the red bug in your "Heading Indicator" to the
expected runway-heading. That means you fly the downwind (3) with the bug
vertically down, the base (4) with the bug
horizontally left, and the final (5) as usual with
the bug on top.
You will use upwind (1) and crosswind
(2) only
for starting.
- 1 = Upwind:
Aircraft take off from the runway and climb. If they are leaving the
airport, they just continue climbing straight ahead until clear of the
pattern and then do whatever they like. If they are returning to the
runway (for example to practice landing), they continue climbing until
they reach a couple of hundred feet below ‘pattern altitude’. This
varies from country to country, but is usually between 500ft and 1000ft above Ground Level (AGL).
- 2 =
Crosswind:
Continue to climb to pattern-altitude (800-100 ft AGL). After 45-60 seconds on crosswind
do another 90°, turning to
- 3 = Downwind:
Hold the altitude (800-1000 ft AGL).
And watch it:
All incoming traffic will join in here and may be on different
altitudes and speeds - so it may be difficult to spot them - watch out!
- It is difficult to give an exact point when to turn for base -
the most used definition is: 45° from the threshold!
So while you are on downwind look to the runway/airport and turn if you
see it 45° behind.
- Being on Downwind
- reduce the RPM to 2000 and hold the altitude --> speed
will reduce
- when within the "white Speed marking" set the Flaps to Stage
1 --> let the IAS settle at 80 kn
- at the end of downwind you should have the following attitude
(for our Cessna!):
RPM ~2000,
Airspeed ~80
kn, Flaps on Stage 1.
- 4 = Base:
Here you start your final descent:
- Reduce the RPM slowly to 1500 and set Flaps to stage 2.
- Hold the "Vertical-Speed" at about 500 fpm (feet per Minute)
- Look for the runway: Shortly before you cross the virtual
centerline of the runway do your last 90° turn to:
- 5 = Final: I very seldom hit that
point exactly - so I usually have to straighten out my course with the
runway: Do that as soon as possible and as fast as possible. See the
chapter "Final".
Give special attention to the following critical areas when in the
patter:
- see in
Magenta
those places where traffic joins in from outside. You should consider
that those might join in on a different altitude and speed! (Yes: That
is not allowed, BUT...)
- see in Green
those
places where outgoing traffic will leave the pattern. These are
especially dangerous for you when you come from the other side of the
airport and thus have to cross the departure areas! See e.g. the
approach to KLVK during our "VFR X-Country", chapter " Join the Pattern"!
If you want to know more about it, see: http://en.wikipedia.org/wiki/Airfield_traffic_pattern
Straight
In:
A "Straight in“ should look like:
- Approach the airport on the virtual centerline of the runway, a
little above the Pattern altitude. e.g.:
- ca. 1500 ft above runway altitude, RPM ~2500 and IAS ~115 kn.
- About 5 mi out from the threshold reduce the RPM to 1500 and hold
your altitude!
- Watch the RPM: That might reduce in the following - keep it
steady on 1500
- The IAS will reduce
- Inside the "white speed-marking" set "Flaps Stage 1" ("]“)
– this continues to reduce the IAS
- Continue to hold the altitude - and
watch the IAS going down to ~70 kn
- Hold that ~70 kn until you start your "Final Descent":
- Hold the IAS at 70 kn by adjusting the Elevator/Trim to descent more
shallow or steep, do not change the RPM (throttle!)
- After you are on a stable descent (1500 RPM at ~70 kn)
start concentrating onto the runway in its full length (and just a tiny
little more onto the threshold!):
- If the runway moves upward - apply some throttle to reduce the "Vertical Speed" - while holding the IAS on ~70 kn!
- If
the runway moves downward - reduce some throttle to
increase the "Vertical Speed" - while holding the IAS on ~70 kn!
- Do only fly very shallow turns if you need to correct the
heading!
With other words: Do anything you like -
but keep the speed on ~70 kn !!
- At 1000 ft above Runway-altitude set "Flaps Stage 2" ("]") and hold the
IAS=~70 kn --> that means you will start to descent!
Final
Check:
- Autopilot
"Off" (if "ON": Mouse-Click the "AP“-button. (The display will flash
some time to warn - and only after that the AP will be off!)
- Mixture
"full rich" ("m" or mouse-wheel)
- Activate the Carb-Heat:
If you came down from high altitudes into moister air then you may
experience icing in your carburetor! That could become a real shocker
if the engine stops shortly before touchdown! So pull the lever out
completely (with a mouse-click over it).
Straighten out:
Do not just look to the threshold - it is much more important to get
the direction corrected! (If you
settle down a little after the threshold - who cares?) i.e.
- your course
must be centered on the prolonged virtual centerline
of the runway
- your nose (hdg)
may be off that direction to counteract the cross-wind

It would be wonderful, if you came in already as outlined in (a)!
But chances are: It will not be that easy!
- then do not aim towards the threshold (b)
- rather aim towards a point as far as possible in
front of it (c)
- and then merge into the centerline
The earlier you are on that "centerline" the easier you can adjust for
heading,
altitude and speed. If you need to get hasty you have lost
already
|
- At about 500 ft above the runway set "Flaps Stage 3" ("]“).
That will reduce the speed to about 60 kn - hold that one now. And use
extreme care: The speed is now very critical just 15 kn above stall -
that means gusts may stall you if you get slower!
- At about 3 ft (1 m) above runway "round out":
- Very smoothly pull the elevator so that you stop the descent
and continue horizontally - that will reduce the speed even more
- Now slowly reduce the "Throttle" and equalize that by the
elevator, so that you continue to fly just a few inches above ground
- The IAS will continue to reduce and finally you will stall --
hopefully close to 1 inch above the runway!
- And because you applied lots of elevator you will just land on
your main-wheels
- Keep this attitude until also the front wheel
will settle down at about 40 kn.
- Remember at that point of time you steer with the
front-wheel, so keep your left mouse-button pressed if you control the
direction with the mouse!
- Start using the breaks ("b") only after the
speed reduced to below 30 kn - otherwise you may tilt!
- If needed use the differential breaking
- Exit the runway not faster than 10 kn!
VASI/PAPI
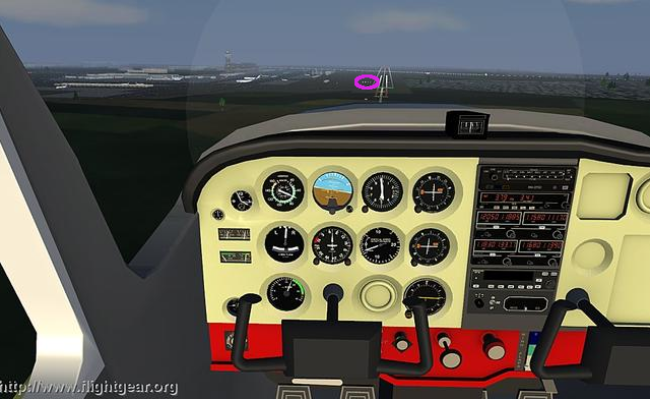 At many
major airports you find helpful light-signals which indicate the correct
"Glideslope" for touchdown. At many
major airports you find helpful light-signals which indicate the correct
"Glideslope" for touchdown.
In the picture you see the so called PAPI. That are 4 lights side by
side. When you see 2 red and 2 withe lights your altitude is perfect,
more red than white means too low, more white then red means too high.
See the picture, it is nearly perfect:
» 70 kn at 1500 RPM
» "Vertical speed" -500 fpm
» 2 white and 2 red lights on the VASI
» and only a very shallow turn to the right, straightening out for the
runway centerline!
If you need drastic corrective actions at this point, you better go
around (see next).
For more details see http://en.wikipedia.org/wiki/Visual_Approach_Slope_Indicator.
|
Go Around
There are many reasons why you might or must abandon the approach and go
around. e.g.:
- You just did not achieve a good landing-configuration - so
you better retry! And please do not be ashamed of a "Retry - GoAround"
-
with that option you can learn - with a forced landing you just could
get some laughs from spectators! Or do you really want to see that
landing (with your name) as a film in the Internet - for ever!?!
- But there are also reasons for a GoAround, that you are not
responsible for:
- ATC may order you to GoAround - then you do that at once
without any discussion - or you might go to jail! Seriously: If
ATC orders a GoAround because of a sudden safety hazard and you do not
follow - that becomes very critical for your pilot-license!
- You got caught by a gust of wind and cannot recover smoothly
- Birds, Automobiles, People, etc. on the runway
- etc.
During each approach you should count on having to GoAround. In that
case you perform the following procedure:
- full power
- start climbing as soon as possible
- do that smooth (remember: You may already be very slow - close
to a normal Stall - so a "high
speed" Stall is near!)
- retract Flaps and Gear
- check the trimming
- hold runway heading until at least 500 ft AGL
- after that you start a new approach:
- if on VFR
without an ATC you do a pattern (you should know before
approaching
if the pattern is left or right!)
- if on VFR
with ATC you must inform ATC as soon as possible and ask for
instructions
- if on IFR
you must have studied the "Missed Approach Procedures" prior to
approach (see e.g. the chapter "IAP": See the "Missed Approach" in the
upper right corner of the IAP-map!)
Communication
After some time you probably get bored of just flying by yourself. To
get some entertainment you have 3 options to communicate with others:
1. The Chat Menu:
(Available with and without the Multiplayer-function activated)
 First you need to set the tower-frequency into your COM1 First you need to set the tower-frequency into your COM1
Then keying
"'"
or "-"
opens the so called Chat-Menu (in
the following I use the "-" because it is easier to spot!). This
presents option's to communicate
with AI ATC's and/or Unicom, i.e. you can
advise other traffic in the
area or AI-ATC that you intend to land or start etc. AI-ATC will then
advise what to do. According to the numbers shown in the menu you
select
questions and answers by typing those numbers. e.g.:
"0" goes
back one selection (e.g. you mistyped "3" but wanted "2" then type:
"02")
"-1" opens an
input field in which you can type any message - this is only useful if
you are connected to the Internet and want to send a message to some
Multiplayer. This is similar to the input-part of the "Chat Dialog" (see
next) - if you are satisfied with displaying the response just on
the screen, then typing "-1"+text
may be preferable over sending a message via menu
→
Network → chat.
"-2" opens
a sub-menu for Unicom
messages, that are messages at airports without
ATC, just to inform other pilots. e.g.:
+" 2" = " -22" =
Departing: Opens another sub-menu for messages related to
departures
+"8" = "-228" =
"..departing runway xyz ..."
"-3" opens
a sub-menu for messages to the (AI) ATC, i.e. that could be used for an
artificial ATC or a human one, being connected to the Internet. e.g.
"-342" = "Tower,
I am ready to taxi" (Tower will answerer "xyz taxi to runway ..."
"-347"
= "Tower, I am holding short runway..."
e.t.c.
"-4" = has
no sub-menu, it is just an emergency short notice ".. going around .."
"-5" =
again without sub-menu, is just a "Roger"
indicating that you understood (and will do!)
You close that menu by "Esc"
|
As well for the above generated messages ("-1text") as also
for the following one (input
field) FlightGear will always add your call-sign in
front - so you should start your messages with the Callsign of the
Addressee: "jomo ATC request
taxi to active"
jomo automatically inserted by FlightGear
ATC
the Multiplayer you want
to address
2. Chat Dialog:
(Only available if the
Multiplayer-function is active)
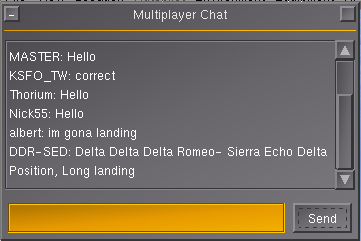
Select: menu
» Multiplayer » Chat Dialog
In
the upper part you see the latest messages listed (and you see in some
lines what
I do not like at all: Do you have any idea who is talking to who and
who should answer? In your messages you should always name the MP you
want to address!)
In the yellow field you can type a message to some other Multiplayer
Click "Send" when ready with typing.
The window will stay open until you click into the square in the upper right
corner
|
3. FGCOM: (only
available if the Multiplayer-function
is active and FGCOM is installed
and started)
This is by far the most
professional and easiest way to communicate. It is like the
Radio-Communication between real pilots and/or ATC.
It especially does not require any typing - you just hit the PTT-switch
("Push To Talk") when you want to speak to pilots and/or ATC in the
area -
you hear their answers via loudspeaker --> and your hands are free
to fly!
The only drawback is, that some guys just cannot talk without showing
off their stupidities. That is bad for everybody and especially bad for
girls - sorry enough some people rather do not use FGCOM because of
that!!! Very very sorry!!
see the Feature FGCOM
and/or the FlightGear-WIKI http://wiki.flightgear.org/index.php?title=Fgcom
|
The Wind
Consider a hot air
balloon and think of it as being in the middle of a gigantic cube of air.
The cube of air may move at high speed compared to the ground, but the
balloon itself is completely static in the middle of the cube. Whatever
the wind speed, persons aboard a hot air balloon experience not a
breath of wind.
In the same way, an aircraft flies in the middle of a gigantic cube of
air and flies relative to that air mass. The motion of the cube of air
relative to the ground has no effect on the aircraft itself. But You, the pilot, are also interested in the speed of the
surrounding air compared to the ground. It can make you drift off the course to the
left or to the right. It can make you arrive at your destination much
later or much sooner than planed. e.t.c.
So in summary:
 Wind:
A balloon will be moved with a speed of 20 kn to enjoy people, who
do not feel
any wind - while people on the ground may have to run after their blown off
hats! As a pilot, taxiing on ground and thus exposed to this wind as
crosswind, you should take care that the wind does not tumble your beloved
Cessna onto the back! Wind:
A balloon will be moved with a speed of 20 kn to enjoy people, who
do not feel
any wind - while people on the ground may have to run after their blown off
hats! As a pilot, taxiing on ground and thus exposed to this wind as
crosswind, you should take care that the wind does not tumble your beloved
Cessna onto the back!
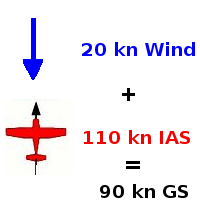
IAS (Indicated Air-Speed) is
the speed you are interested in, while controlling your aircraft
to keep it up in the air!
GS
(Speed above Ground)
is the speed you and your passengers are interested in: When do we
arrive at the target! How much fuel do you need? etc.
When (as shown) the wind blows in the opposite direction (towards the nose of the
plane), the speed of the wind subtracts itself from the airspeed of the
plane. Hence you move slower compared to the ground. You will arrive
later at your destination and thus have more time to enjoy the landscape (for another 13 min).
When the wind blows in the same direction as
you fly, the speed of the
wind adds itself to the airspeed of the plane. Hence you move faster
compared to the ground. You will arrive earlier at your destination (actually you will be 11 Min early).
|
The two cases above are quite simple. It becomes more complex when the wind
blows towards the side of the airplane. Consider the following:
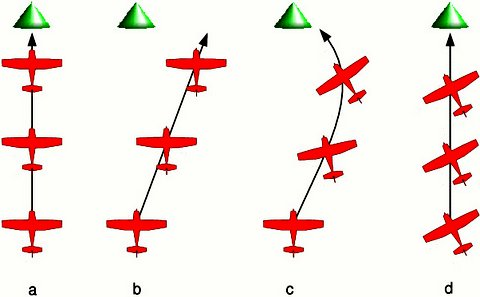 In
picture (a)
there is no cross-wind. The pilot wants to reach the green hill situated to
the North. He heads for the hill, towards the North, and reaches the
hill after a while. In
picture (a)
there is no cross-wind. The pilot wants to reach the green hill situated to
the North. He heads for the hill, towards the North, and reaches the
hill after a while.
In picture (b),
the pilot keeps heading to the North. Yet there is wind blowing from
the left, from the West. The airplane drifts to the right and misses
the hill.
In picture (c),
the pilot keeps heading towards the hill. This time he will arrive at
the hill. Yet the plane flies a curved path. This makes the pilot lose
time to get to the hill. Such a curved path is awful when you need to
make precise navigation.
Picture (d)
shows the optimal way to get to the hill. The plane is directed slightly towards the West into the wind. That way it
compensates for the wind and remains on a straight path towards the
hill - thus keeping the "course" with whatever "heading" is needed!
|
Just how much to the left or to the right of the object do you have
to
head?
At what angle? Serious pilots use geometry and trigonometry
computations to calculate the correct angle. But for simple guys like
us such an exact calculation is not really needed. The trick is to
choose an aiming point
in the direction you wish to fly, then observe how it moves. You will
become aware if you are drifting leftwards or rightwards. Then let your
instinct slowly head the plane to the right or to the left to
compensate the obvious drift. To begin with, you may need to think
about what you are doing. Very soon this will become automatic, just
like when you learned to fly straight. You will no more keep the plane
headed towards the object. You will rather keep it flying towards the
object.
But what can you do when you want to fly 110 Miles with a speed of 110
kn and the wind is 20 kn directly from the side? Well: If you do not do
anything you pass your target in a 20 miles distance - thus never ever
seeing it! So you better cut the rout in small pieces that you can
overlook - or start calculating!
And now you know (and never forget!) the difference between
"heading" = where the nose points to
and
"course" = the way you move above ground
The higher the IAS is, compared to the
wind speed, the less
corrections you will need - and reverse!
Those little challenges make flying
small planes much more interesting compared to those big airliners
where you just get confronted with these facts when being on final and
having problems to aim towards the runway! So we will revisit that a
little later - even with a nice picture!
Taxi with Crosswind
At a wind below 10 knots the Cessna 172p does not need particular
precautions
when taxiing. Yet any sudden increase in wind speed (e.g. a gust!)
can tilt it and/or
tumble it over. So we urge you to always apply the following
recommendations, independent of the noticed wind! And never forget:
With whatever speed you taxi - that is the same as a wind from the
front! i.e when you (of course absolutely unintentionally!) taxi at 45 kn with the Cessna you will take off (if you have not taken the following precautions!).
To train taxiing on the ground when there is wind, configure the
simulator for a strong wind, like 20 knots. Such a wind can tilt the
plane and blow it away any moment. One single error during
taxiing and the plane is
lost!
So always stick to he main rule:
push the
yoke towards the wind
|
Let us investigate some examples:
- When there is no wind,
do we have to care?? Oh yes! Then the wind is coming directly from 12
o'clock (even if you might not call
it wind but rather airstream - the effect to your aircraft is the same!)
- i.e. if you do nothing and taxi with some speed you will get into
trouble: It is getting hard to steer, because the front wheel might
rise! And in general you are just before taking off - so it is much
easier to tilt when turning on ground!
- When the wind is blowing from 12 o’clock
this is quite logical: The yoke is pushed forward (towards 12 o’clock) - thus the
elevator makes the tail rise a little. That’s the most stable position
to avoid the plane be tilted by the wind.
- When the wind comes from 10 o’clock,
pushing the yoke towards 10 o’clock means that the elevator is almost
neutral, while the left aileron is upward and the right aileron is
downward. This pushes the left wing down and lifts the right wing -
that is the most stable position to avoid the plane being tilted to the
right.
- When the wind blows from 8 o’clock,
you would think you should invert the position of the ailerons, to keep
the left wing being pushed down. Hence you should push the yoke to 4
o’clock. Wrong! Keep pushing the yoke to 8 o’clock. The reason is the
downward position of the aileron on the right wing makes it act like a
slat. This increases the lift on the right wing and this is all we
want. Symmetrically, the upward position of the left aileron decreases
the lift of the left wing.
- When the wind comes from the rear, from 6 o’clock,
the yoke is pulled (towards 6 o’clock). The upward position of the
elevator tends to make the tail be pushed down. Once again this is the
best - even though a strong wind now could push the tail against the ground! But the tail is conceived to withstand this.
If you want to move towards the wind, you will need more engine power.
When the wind blows from the rear you may need no engine power at all.
Always keep the engine power to the minimum needed.
Especially when turning, move very slowly. Make little changes at a
time. Take your time and closely survey the yoke angle. Constantly keep
it pushed towards the wind. Constantly try to reduce the engine power.
Keep in mind, that using the brakes too firmly may shortly raise the plane-tail - thus allowing the wind to attac and tilt us.
Just a little tip:
In the new HUD there is a big fat
arrow indicating from where the wind is coming - so steering towards
the wind is easy when using the HUD!
Crosswind Take Off
Taking
off when the wind is coming from the side is tricky. Airport designers
avoid this by placing runways so that they face into the prevailing
wind. Often airports have multiple runways, placed such that there will
be a runway facing straight into wind as much of the time as possible.
Taking off with a wind blowing straight towards the nose of the
aircraft makes life easier as it is the speed of the wing relative to
the air that causes lift. When there is no wind, the aircraft must
accelerate to 55 knots to take off. However, if there is a 10 knot
head-wind, the aircraft has an airspeed of 10 knots standing still and
only has to accelerate to 45 knots relative to the ground to take off.
This shortens take-off distances.
Just as a headwind shortens take-off, a tail-wind increases take-off
length. Anything more than a knot or two makes a huge difference to
take-off distance. As (most) runways can be flown from either end, you
can easily take off from the other end of the runway and benefit from
the headwind.

The main way to know the wind direction and speed is to go to the
control tower or ask the control tower by radio.
A necessary and
complementary tool are the windsocks at both ends of the runway. They
show the wind direction
and speed. The longer and the stiffer the windsock, the more wind there
is.
The windsock on the picture shows an airspeed of 5 knots (see the
buckling in the center!), coming from the right! |
Unfortunately, sometimes there isn’t a runway facing the wind, and
you have to take off when the wind is blowing from the side. Then the
technique is as for a normal take-off - with two changes:
- During the take-off roll, the aircraft will try to “weather-cock”
into wind. You must react by using the rudder to keep the aircraft
running straight. You will have to apply the rudder at quite a strong
angle to stay aligned
with the runway (which is expected from you up to a certain height!).
You will need to keep applying rudder throughout the take-off.
- As you take off, the aircraft will react to the rudder and try to
turn. You will need to correct for this using the ailerons. Once the
aircraft is in the air, you can reduce the rudder pressure and aileron,
then correct for the wind, to keep aligned with the runway as described
above.
Crosswind Landings
Reality: A Boeing E-3A landing with Crosswind!
|
In General you need to obey the normal rules as also for the normal landing
- but try to line up with the runway heading even sooner, in order to
have time to get a "feeling" for how much the wind effects you and how
much reaction you have to apply! You will not come in with the nose
pointing in direction of the runway! So you need to differentiate (and
learn) how to move along the extended centerline of the runway while
holding the nose into some other direction. You may find that being not
as easy as it sounds:
- Keep the whole length of runway in your view and juggle your
controls to move exactly along the extended centerline of the runway.
That probably needs some rudder against the wind and some ailerons
opposite to that rudder! (Did you notice that: Aileron and Rudder
opposed?
If you still have the option "--enable-auto-coordination" active - then
you are getting into trouble right now!)
- Keep that attitude until those last few inches above ground, then
- use a ridged, but well dosed, kick into the rudder so that the
aircraft nose "JUMPS" into the direction of the centerline
- you then will settle down on one wheel first! Hold the
direction
with the rudder until all wheels settled down
- Then taxi as described under "Taxiing
with Wind".
That is the so called "Slip-Landing". You may see more details and
additional methods in e.g.: http://en.wikipedia.org/wiki/Crosswind_landing
|
Runway & Wind
We did see, that we never should forget about the wind - especially
when moving on ground! And even more so when in transient from "moving
in air" to "moving on ground" - i.e. during TakeOff and Landings!
- with headwind our ground-speed is less - that means we can use a shorter runway
- with
tailwind our ground-speed is higher - that means we need a longer
runway, and our breaks and tires will wear down much more
- and there also is always a crosswind-component that wants to blow us off the runway!
Thus we must land/start as direct against the wind as possible! This is
also true if there is only a very calm wind or even none at all: In
that case the pilot arriving first decides what runway to take! Otherwise we end up with
plans heading towards the same runway from different ends - and there is no
room to sidestep on a runway!
But how do we know which runway is the most favorable?
- You probably remember, that runways are named according to the direction they point to (divided by 10)
- thus "rw18" runs from North (360°) to South (180°)
- So that is easy: If the wind comes from the South with 10 kts ("wind 180 @ 10") you land southward on runway 18!
- or the one closest to 180° !
Let us explain it with a picture:
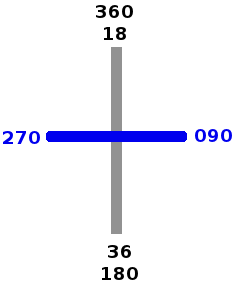 - On runway "18" you land by flying South (180°), so that is the runway for all Wind-directions from below the blue line.
- Or mathematically: For all wind-directions between (rw18=) 180° ± 90°
- On runway "36" you land by flying North (0° or 360°), so that is the runway for all Wind-directions from above the blue line.
- Or mathematically: For all wind-directions between (rw36=) 0° ± 90°
Yes: 090° and 270° (and values close to it) are a problem - by which it
does not really matter if you take the rw18 or the rw36. The first pilot
arriving at that airport (or the ATC!) define which one to take!
|
I must admit: The above example is very simple - and still sounds
somewhat complicated. I myself prefer a simple "guessing" instead of
calculating it precisely! See the following 2 exercises:

- Wind from 050°: guess for
- rw18: 180-050>90 180+50>90: both results are greater 90 --> thus we cannot use rw18 (180°)!
- rw36: 360-050>90 360+50<90: the second result (360+50 = 410-360=50) is smaller 90 - so we can use rw36 !
- Wind from 120°: guess for
- rw18: 180-120<90 180+120>90: the first result (180-120=60) is smaller 90 - so we can use rw18!
- rw36:
360-120>90 360+120>90: both results are greater 90 --> thus we cannot use rw36 (360°)!.
Notice:
Although there are always 4 possibilities to consider - there is
always only one valid result. So as soon as you found one fitting
runway, you do not need to analyze the rest! Thus this "guessing"
becomes very fast!
|
Flying Other Aircraft
To the end of this some hints to the future, when you fly different
style aircraft.
I cross-checked all the data
about the Cessna 172p, a pilot friend verified I did not write too much
rubbish and I made numerous virtual test flights. This section contains
less reliable data about other airplanes based on my experience in the
simulator. You may find it useful as an introduction to those airplanes
but bear in mind my only goal was to make flights that seem OK and
acquire basic knowledge.
The Cessna 172 and the A-4 Skyhawk are two extremes. Most other
airplanes are in-between these two extremes. If you trained them both
(and one or two tail wheel airplanes), you should be able to find out
how to take off and land most other airplanes.
Low-Wing: Cherokee
Warrior II
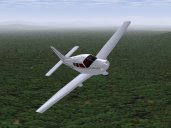 The
Cherokee Warrior II has some advantages upon the Cessna 172p.
Thanks to its low wings it is far less sensitive to crosswind. Fully
extended flaps provide more lift, thus it can fly slower and thus allows it to land on a much
shorter distance. The
Cherokee Warrior II has some advantages upon the Cessna 172p.
Thanks to its low wings it is far less sensitive to crosswind. Fully
extended flaps provide more lift, thus it can fly slower and thus allows it to land on a much
shorter distance.
Take off is the same as for the Cessna 172p in FlightGear. In real life
their take off checklists are not exactly the same.
|
You have to get used to some minor differences of the Cherokee Warrior
II for the landing:
- During the steady horizontal flight before landing, the trim must
be pulled a little below neutral in order to get the yoke around
neutral.
- The optimal tachometer RPM during landing is at a lower RPM than
the tachometer green zone. Roughly, keep the needle vertical.
- Only put use two steps of flaps during landing. Don’t decrease
the
engine throttle too much.
- If you remain at two flaps deployed during landing, the round-out
and flare will be similar to the Cessna 172p. However, using the third
set of flaps will slow the aircraft down dramatically. It will very
quickly touch the runway then come to a near halt. Be prepared to lower
the front wheel very soon. (It is possible to use the third flaps step
during the descent towards the runway, instead of tuning the engine
power down. Oscillating between two steps and three steps allows to aim
the runway start. Yet keep two flaps steps and tune the engine seems
easier. An interesting stunt is to fly stable till nearly above the
runway start, then tune the engine to minimum and deploy three flaps
steps. The plane almost falls to the runway. It’s impressive but it
works.)
In real life, an advantage of the Cessna 172p upon the Cherokee Warrior
II is the fuel tanks of the Cessna are located in the wings close
above the center of the plane and higher than the engine. What’s more
an automatic system switches between the reservoirs. That means you
almost don’t have to bother for the way the fuel gets to the engine in
flight. On the contrary, on the Cherokee Warrior II the reservoirs are
located separately, on both wings and lower than the engine. That means
you have to constantly switch between the two reservoirs in flight.
Should one reservoir become much lighter than the other, this would
destabilize the airplane. The fact the reservoirs are lower than the
engine means you have to control the fuel pumps and the backup fuel
pumps.
Some links:
Tail Wheel: Piper J3
Cub
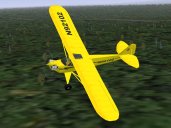 The
Piper J3 Cub is a very different airplane from the Cessna 172p and
the Cherokee Warrior II. The Cessna 172p and the Cherokee Warrior II
are nose-wheel airplanes, while the Piper J3 Cub is a tail wheel
airplane. Take off and landing with tail wheel airplanes is more
difficult. You have to tightly use the rudder pedals when rolling over
the runway. The yoke often needs to be pulled backwards to the maximum.
The Piper J3 Cub is a good introduction to tail-wheel aircraft and it
is quite easy to take off and land provided you follow an appropriate
procedure. Stall speed seems to be a little below 40 mph (the airspeed
indicator is in mph) (about 27 knots). Take-off is below 50 mph. The
Piper J3 Cub is a very different airplane from the Cessna 172p and
the Cherokee Warrior II. The Cessna 172p and the Cherokee Warrior II
are nose-wheel airplanes, while the Piper J3 Cub is a tail wheel
airplane. Take off and landing with tail wheel airplanes is more
difficult. You have to tightly use the rudder pedals when rolling over
the runway. The yoke often needs to be pulled backwards to the maximum.
The Piper J3 Cub is a good introduction to tail-wheel aircraft and it
is quite easy to take off and land provided you follow an appropriate
procedure. Stall speed seems to be a little below 40 mph (the airspeed
indicator is in mph) (about 27 knots). Take-off is below 50 mph. |
My take off procedure for the Piper Cub is to fully pull the yoke
backwards then throttle the engine to maximum. Once the front wheels
clearly rises from the ground, gently push the yoke back to neutral,
towards a normal flight close above the runway. Let the plane
accelerate to 50 mph. Then pull the yoke to keep a little more than 50
mph while rising in the air.
The landing procedure is quite different to that of 172, as the
aircraft is very light, and has no flaps:
- Fly at say 500 feet constant altitude and "exactly" 52 mph speed
towards the runway. Let the engine cover eat up the runway start. The
engine cover will hide the runway completely. To see where the runway
is, push the yoke/mouse very shortly then stabilize again in normal
flight.
- Once the runway start matches with the set of instruments (if you
could see through the instrument panel), reduce the throttle to a near
minimum and begin the dive towards the runway start. Keep 52 mph using
the yoke. Add some throttle if you are going to miss the runway edge.
(Keep in mind just a little wind is enough to change things a lot for
the Piper J3 Cub).
- Make the rounding and pull the throttle to minimum. Do not pull
steadily on the yoke. Instead let the wheels roll on the runway
immediately.
- Once the wheels roll on the runway, push firmly on the yoke, to
its maximum. This rises the tail in the air. You would think the
propeller will hit the runway or the airplane will tilt over and be
damaged. But everything’s fine. The wings are at a strong negative
angle and this brakes the plane. (Don’t push the yoke this way on other
airplanes, even if their shape seems close to that of the Piper J3 Cub.
Most of them will tumble forwards.)
- The yoke being pushed in to its maximum, push the left mouse
button and keep it pushed to go in rudder control mode. Keep the plane
more or less centered on the runway. This is quite uneasy. One tip is
to stop aiming the rudder to say the left already when the plane just
starts to turn to the left.
- Once the speed is really low (and the rudder control stabilized),
you will see the tail begins to sink to the ground. Release the left
mouse button to go back to yoke control. Pull the yoke backwards
completely, to the other extreme. The tail now touches the ground and
the nose is high up. Now you can use the wheel brakes (b). (If you use
the brakes too early, the plane nose will hit the ground.)
The take off procedure mentioned above is symmetrical to the first
landing procedure. There exists a second take off procedure,
symmetrical to the second
landing procedure. Yet I don’t succeed it properly so I won’t write
about it.
WWII-fighter: P-51D
Mustang
 Should
you ever get a chance to pilot a P-51 Mustang, just say no. It
is quite dangerous to take off and land. That’s the kind of airplane
you fly only when your country is in danger. You need a lot of
training. Yet once in the
air the P-51 Mustang seems no more dangerous to its pilot than other
common military airplanes. It is quite easy to pilot. Should
you ever get a chance to pilot a P-51 Mustang, just say no. It
is quite dangerous to take off and land. That’s the kind of airplane
you fly only when your country is in danger. You need a lot of
training. Yet once in the
air the P-51 Mustang seems no more dangerous to its pilot than other
common military airplanes. It is quite easy to pilot.
At low and medium altitude the P-51 wasn’t better than the Spitfire and
the Messerschmitts. The big difference was at high altitude. The P-51
kept efficient and maneuverable while enemy fighters were just capable
to hang in the air. This was an advantage at medium altitude too
because the P-51 was able to plunge towards enemy airplanes from high
altitude. Another key difference was the P-51 is very streamlined.
Hence it was capable to fly much further than the Spitfire. These two
differences let the P-51 Mustang fulfill its purpose: escort Allied
bombers all the way to their targets in Germany. This allowed the
bombings to be much more efficient and contributed to the defeat of the
Nazis. |
To get the The P-51D Mustang in Linux use the -aircraft=p51d command
line parameter.
To take off the P-51D Mustang in FlightGear, deploy one flaps step,
pull and keep the yoke completely backwards, push the engine throttle
to maximum and keep the left mouse button pressed to control the rudder
and keep on the runway. Once you reach exactly 100 mph, suddenly push
the rudder 1/3 of its total way to the right. Immediately release the
left mouse button and push the yoke to rise the tail (don’t push it too
much, as the sooner the wheels leave the ground the better). From now
on, keep the left mouse button released. Only make very short
adjustments to the rudder. Let the plane rise from the runway and get
to altitude at a speed of say 150 mph. Don’t forget to retract the
landing gear and the flaps.
Don’t make too steep turns. You would loose control on the plane and
crash.
To land, deploy full flaps and lower the landing gear from the start
on. 130 mph speed seems fine, up to 140 mph. Make an approach from
1,000 feet altitude and a dive at a low angle, like for a jet. Once
over the runway, shut the engine down completely (key{). Don’t hover
over the runway. Get the wheels rolling soon (like for a jet). Hold the
left mouse button down to steer the plane using the rudder. Once the
tail sinks in, briskly pull the yoke (left mouse button shortly
released) to force the tail on the runway. Go on steering the plane
using the rudder. Now the tail is firmly on the ground, use the brakes
if you want.
Jet: A-4 Skyhawk
Take off on a jet is easy but you must have fast reflexes. My favorite
jet on FlightGear is the A-4 Skyhawk. You get it with the
-aircraft=a4-uiuc parameter on Linux, provided it is installed.
|
This is the “calm” procedure to take off:
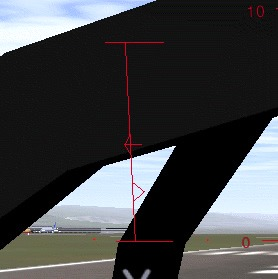
- Ask for a red and full HUD
by typing "h"
two times. The engine
throttle indicator is the leftmost on the HUD.
- The airspeed indicator is the one labeled "KIAS" on the
upper
left side of the instrument panel. You can also use the airspeed
indicator on the HUD, of course.
- Keep the yoke pulled in 1 of its total way (see the
picture:
the red
arrow on the right side of the vertical line in the middle of the
picture).
- It is not mandatory to use the rudder to keep on the
runway. The
airplane will take off before it drifts off the runway. (For sure it is
better and more “secure” to keep in the middle of the runway. But using
the rudder can make things hectic for a beginner.)
- Once above about 160 knots, the plane rises its nose in the
air.
Immediately push the yoke back to neutral or almost and stabilize at
200 knots airspeed (which makes a fair climb angle) (I’ve no idea
whether 200 knots is the right climb speed for a real A-4. What’s more
I suppose one should rather use the AOA
(see below).).
- Retract the landing gear using key "g".
- Either maintain ˝ engine power and a speed of 200 knots to
get
above the clouds, or reduce the engine power to less than Ľ and fly
normally. (Off course you can “fly normally” with full engine power.
Great fun.)
|
The “nervous” take off procedure is the same but you push in full
engine power. The plane takes off quickly and you need to settle a very
steep climb angle to keep 200 knots. Best retract the landing gear
immediately.
You don’t land a jet the same way you land a little propeller airplane.
My way to land the A-4, inspired by some texts I found on the Web, is
this:
- Really far from the runway, keep below 2,000 feet and get the
speed below 200 knots. Then lower the landing gear (key G) and I deploy
full flaps (all three steps, by hitting "]" three times).
- Keep a steady altitude of about 1,000 feet and a speed of
“exactly” 150 knots. Use the mouse/yoke/elevator to tune the altitude
and the engine throttle to tune the speed. (The opposite from the
Cessna.)
- Try to align with the runway.
- When do you know the dive towards the runway must begin? For this
you need the HUD; the full default HUD with lots of features. Look at
the picture below:
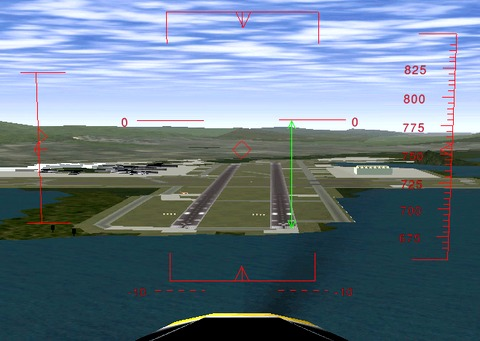
|
When you see the “distance”
between the red “0” lines and the runway
start is 25% the distance between the red “0” lines and the red “−10”
dotted line, it is time to dive, aiming at the runway start. (In the
picture below, that “distance” is 64%, far too much to start a landing.)
Let’s explain this. The two horizontal lines labeled “0” show the
horizon line. Rather they show where the horizon would be if the Earth
was flat. When your eyes aim at those “0” lines, you are looking
horizontally. Look at the dotted red lines labeled “−10”. A feature on
the ground situated there is situated 10° below the ideal horizon. In
other words: when you look to objects “hidden” by the lines labeled
“0”, you have to lower your eyes of 10°to look at objects "hidden" by
the dotted lines labeled “−10”. This implies, and it is very important,
that a person in a rowboat, “hidden” by the dotted lines labeled “−10”,
has to rise his eyes up 10◦ to look at your plane. He sees you 10°
above the horizon. In the picture above, the start of the runway is
situated at 64% of the way towards the red “-10” dotted lines. That
means you have to lower your eyes of 6,4° to look at the run
|
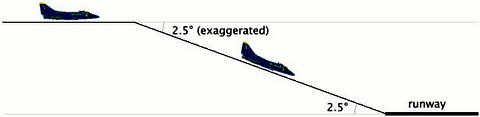
|
This also means that if you
start now to descent towards the runway start, the descent path will be
of 6,4◦ (too steep). So, the HUD allows to measure precisely the angle
of the descent path. On a jet plane you need an angle of 2,5° (up to
3°), that is 25% of −10° (up to 30%). |
- Once descending towards the runway start, aim at it using the
yoke/mouse. And keep 150 knots speed using the engine throttle lever.
- Keep measuring the angle between the ideal horizon and the runway
start. It must keep 2,5° (that is 25% of 10° ):
- If the angle increases above 2,5° , you are above the desired
path and you must loose altitude faster. Both decrease the engine power
and dive the nose a little.
- If the angle decreases below 2,5◦° , you are under the desired
path. I wouldn’t say you should gain altitude, rather you should loose
altitude less fast. Both add a little engine power and rise the nose a
little.
- Once very close to the runway start, do no rounding. Don’t pull
steadily on the yoke like you would for the Cessna 172p. Simply let the
plane touch the ground immediately, at high speed. Let it smash on the
runway, so to say. All three wheels almost together. Just throttle the
engine down to minimum. (If you try to pull steadily on the yoke and
hover over the runway while the plane nose rises steadily, on a F-16
you would scrape the plane rear and probably destroy it.)
- Keep the key "b"
down to brake and use the rudder to stay aligned with the runway. Make
only very little tunings with the rudder, otherwise the plane will
tumble on one of its sides.
 The HUD in a
real jet contains a symbol to show towards what the
airplane is moving. It is shown in the picture. When you are
flying at constant altitude, that symbol is on the ideal horizon line.
Once you dive towards the runway start, you simply have to place that
symbol on the runway start. This is quite an easy and precise way to
aim at the runway start. (The diamond in the center of the FlightGear
HUD sometimes can help but it does not have the same purpose. It shows
towards what the airplane nose is pointing. For example if you descent
towards the ground at low speed, the symbol would be somewhere on the
ground while the FlightGear diamond will be up in the sky.) (By the
way, the HUD on the virtual B-52 on FlightGear has that symbol. It is
great to use while landing.) The HUD in a
real jet contains a symbol to show towards what the
airplane is moving. It is shown in the picture. When you are
flying at constant altitude, that symbol is on the ideal horizon line.
Once you dive towards the runway start, you simply have to place that
symbol on the runway start. This is quite an easy and precise way to
aim at the runway start. (The diamond in the center of the FlightGear
HUD sometimes can help but it does not have the same purpose. It shows
towards what the airplane nose is pointing. For example if you descent
towards the ground at low speed, the symbol would be somewhere on the
ground while the FlightGear diamond will be up in the sky.) (By the
way, the HUD on the virtual B-52 on FlightGear has that symbol. It is
great to use while landing.) |
Also, a real HUD shows a dotted line at −2,5° , to help find the
correct descent path. Simply keep that dotted line on the runway
thresh-hold.
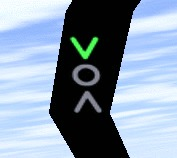 In additional
to airspeed, military fast jet pilots rely on using the
correct angle of attack during approach. The Angle Of Attack (AoA) is
the angle at which the wings are pitched against the relative airflow.
The advantage of keeping to an optimal AoA In additional
to airspeed, military fast jet pilots rely on using the
correct angle of attack during approach. The Angle Of Attack (AoA) is
the angle at which the wings are pitched against the relative airflow.
The advantage of keeping to an optimal AoA
is that the optimal AoA
for
landing does not depend on the plane load, while the optimal airspeed
speed does. By ensuring that the AoA
is correct for every landing, you
will land at the correct speed, whatever the plane load.
The Angle of Attack is displayed within the HUD, and/or as a set of
three lights shown at the left. When the upper "∨" is lit, your
angle of attack (AoA) is too high and you need to pitch down. When the
lower "∧"
is lit, your AoA
is too low and you need to pitch up. The center
indicates your the AoA
is OK. Obviously, as you pitch up or down your
airspeed and descent rate will change, so you will need to change your
throttle setting appropriately. |
Biggy: B-52
Stratofortress
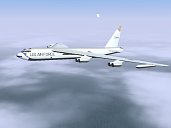 The B-52F
bomber implemented in FlightGear is a success. It is one of my
favorite airplanes. I’m sorry it was conceived to terrify me. One
single B-52 bomber can wipe out every main town of my country and rise
a nightmare of sicknesses and children malformation for centuries. All
B-52 bombers united can wipe out mankind and almost every kinds of
plants and animals on Earth. The B-52F
bomber implemented in FlightGear is a success. It is one of my
favorite airplanes. I’m sorry it was conceived to terrify me. One
single B-52 bomber can wipe out every main town of my country and rise
a nightmare of sicknesses and children malformation for centuries. All
B-52 bombers united can wipe out mankind and almost every kinds of
plants and animals on Earth.
The differences between the virtual B-52F bomber and the Cessna 172p
are these: |
- The B-52F starts with the flaps deployed and the parking brakes
set.
- There are only two flap steps: retracted and deployed. When
deployed they are only meant to make the wings lift more, not to brake.
If you want to brake, you need the spoilers. They deploy on the the
upper side of the wings. Use the key "k" to deploy the
spoilers and the
key "j" to
retract them. There are seven steps of spoilers.
- The main landing gear of the Cessna 172p is composed of two
wheels, one on each side of the airplane. In order for these wheels to
leave and touch the ground altogether, you need to keep the wings
parallel with the ground. The main landing gear of the B-52F is
composed of a set of wheels at the front and a set of wheels at the
rear. This implies that in order for these wheels to leave and touch
the ground altogether, you need to keep the airplane body parallel with
the ground.
This is my procedure to take off the
virtual B-52F:
- Push the yoke 1/3 of the total way.
- Push the engine throttle to maximum.
- Release the parking brakes (key "B").
- Push down the left mouse button to control the rudder pedals and
keep the airplane on the runway
- The whole runway length is needed till the B-52F rises from the
ground (KSFO).
- Once the B-52F leaves the ground, around 190 knots seems
appropriate to get to altitude.
- Retract the flaps and the landing gear.
To land, the B-52F’s HUD offers that great airplane-shaped symbol I
talked about in the section about jets. So you just have to put that
symbol on the runway threshold (a few pixels further seems optimal)
and keep the runway start 2,5° below the ideal horizon line. 130 up to
140 knots seems a good landing speed. (Instead of the speed you can
make use of the AoA
indicator displayed on the schematic instrument
panel (P). ). Simply keep the AoA
at 3° . I must confess I prefer to
tune the speed rather than the AoA
.) If the plane gets to the runway at
130 up to 140 knots, simply “let it smash” on the runway. Otherwise, if
the speed is higher, make a rounding and a short hover. The brakes seem
to be very effective ("b"). They allow
to stop the B-52F on roughly the
same short runway length as the Cessna 172p.
Replays of the flights are a delight. They allow to check the plane
body left the runway and landed back parallel with it. One of the
points of view is situated
inside the B-52F rear turret, which allows you to be your own passenger
and to compare what you see with what you experienced as a passenger in
airliners. The key "K"
allows to visualize the airplane trajectory.
To cause an accident with the B-52 do this:
- Make a steep turn with a very strong bank; the wings nearly
perpendicular to the ground.
- Try to get the plane back level. It will obey but very slowly.
You will get aware that the turn will go on for a while and that you
will turn further than your intended flight direction.
- Do something that accelerates the stabilization on some
airplanes: push the rudder to an extreme, opposite to the current turn.
This will suddenly make the airplane drop from the sky.
Summary off
Differences
The Cessna 172 and the A-4 Skyhawk are two extremes. Most other
airplanes are in-between these two extremes. If you trained them both
(and one or two tail wheel airplanes), you should be able to find out
how to take off and land most other airplanes.
160 knots seems an appropriate landing speed for the F-16 Falcon. Also
you need to throttle down the engine to minimum just before the plane
should touch
the runway. Otherwise it will hover over the runway. Don’t bother for
the flaps. It seems they are deployed automatically with the landing
gear. (Read the chapter about the
stall).
140 up to 150 knots and all 8 flaps steps deployed seem appropriate to
land the virtual Boeing 737. But don’t trust me especially on that one.
I just made a few experiments and didn’t search for serious data. The
landing speed varies a lot depending on the plane load, I suppose 140
knots is for a plane with no load. The Boeing 737 seems to like a
gentle rounding before the wheels touch the runway.
Start the rounding early.
In the take off procedure for the Cessna 172 and the A-4 Skyhawk I
recommend you pull the yoke/mouse/elevator to ˝ the total way, from the
start on. This seems to be a bad practice on the Pilatus PC-7. Keep the
elevator neutral. Let the plane accelerate and wait till the speed gets
over 100 knots. Then pull calmly on the yoke. During landing, deploy
full flaps once you start plunging to the runway but don’t decrease the
engine throttle. Decrease it only when the hovering above the runway
starts. 100 knots seems a good landing speed.
For the Cessna 310 too you better leave the elevator neutral during the
acceleration on the runway. The plane will raise its nose by its own
provided you deployed one flaps step. (If you keep the yoke pulled from
the start on, the nose will rise sooner and you will get awful yaw
problems.)
(Some virtual airplanes, like some
big airliners or fast aircraft, need faster physical computations. Then
add the -model-hz=480 parameter to the commandline. If
the plane is difficult to control during landings, try this.)
The angle at which you land a Cessna 172p is far steeper than the
narrow 2,5° for a jet. Nevertheless you are allowed to land the Cessna
at a narrow angle too. (Provided the terrain around the runway allows
for this, of course.) If you have passengers who have ears problems
with the variation of air pressure...